On February 23rd, the UK National Cyber Security Center (NCSC) with the US Cybersecurity & Infrastructure Security Agency (CISA) and other security agencies released information that the threat actor group known as “Voodoo Bear” or “Sandworm” has been leveraging a modular and fairly sophisticated implant dubbed “Cyclops Blink”.
Cyclops Blink appears to be a replacement of the previously discovered and documented VPNFilter modular implant framework, also previously leveraged by Sandworm. The VPNFilter and Cyclops Blink implants primarily target Small Office/Home Office (SOHO) network devices. The VPNFilter implant was previously used by the threat actor to redirect and manipulate traffic and infected devices were also used to maintain persistence on victim networks.
The devices infected by Cyclops Blink have been incorporated into a large-scale botnet operated by the threat actor, which appears to have first become active as early as June 2019. As of today, of the 1500+ impacted IPv4 that were reported, around 40% are geolocated in the United States.
In its current iteration, Cyclops Blink is highly modular and provides attackers several capabilities (as well as writing and deploying implant modules on the fly). Cyclops Blink has been observed primarily targeting SOHO devices from WatchGuard (Watchguard Firebox appliances). Additionally, Cyclops Blink is deployed persistently on infected WatchGuard devices by abusing the firmware upgrade mechanism.
While Cyclops Blink has only been observed on WatchGuard devices as of today, an assessment of the malware reveals that it could also be compiled and deployed onto other architectures and firmware.
Organizations with WatchGuard firewalls should review the solution section of this advisory for details on how to identify a potential infection and restore the system to a known good state. If the Watchguard management interface was exposed to the internet, organizations should assume the appliance has been compromised and investigate the system for signs of the implant prior to upgrading.
Affected Operating Systems
All Watchguard Firebox appliances are currently known vulnerable. As such organizations with Firebox appliances must be upgraded to the latest versions for the Firebox appliances as soon as possible. The latest Firmware for WatchGuard Firebox appliances is available for download from: https://software.watchguard.com/
Before upgrading any appliances, it is critical to assess whether your Firebox appliance may have been infected with Cyclops Blink. Watchguard, with the assistance of the NSA, CISA, and UK NCSC have provided with different methods to investigate and identify a potential infection as described in https://detection.watchguard.com/
Technical Details
CISA and the NCSC both describe the Cyclops Blink malware as a successor to an earlier Sandworm tool known as VPNFilter, which had infected over half a million routers before it identified by Cisco and the FBI and dismantled in 2018.
This implant is a multi-stage, modular platform with versatile capabilities to support both intelligence-collection and potentially destructive cyber-attack operations. It targets devices running firmware based on Busybox and Linux and is compiled for several CPU architectures.
The first stage primary ensures persistence (via crontab) which sets it apart from other IOT malware such as Mirai. Furthermore, it implements various redundant mechanisms to resolve the address of the second stage deployment server. The second stage once downloaded exposes the usual modules of a remotely management implant Command-and-Control including:
However, some of the most interesting modules are implemented in a third stage and are deployed independently as “plugins”. One such plugin implements a packet sniffer that allows inspection of traffic and consequently theft of credentials.
The Cyclops Blink malware comes in the form of a firmware update which abuses Watchguard’s standard firmware upgrade to install the malicious firmware. It leverages a vulnerability in the firmware update process where the Hash-based Message Authentication Code (HMAC) can be recalculated due to a hard-coded key in WatchGuard Firebox devices used to initialize hash calculation. This allows persistence between reboots.
The Cyclops Blink malware has the following capabilities (most critical ones listed):
• Add a new module to Cyclops Blink. • Update the Cyclops Blink Linux ELF executable. • Update the list of C2 server IPv4 addresses • Resend the current Cyclops Blink configuration to all running modules • Gather all system information like sysinfo, /etc/passwd, /proc/mounts/, …
The full technical details are linked in the reference section.
Solution
Firmware upgrades are available and if you have a legitimate firmware running in your Fireboxes you need to upgrade to the latest versions.
If your Fireboxes have been impacted by a malicious firmware you first need to remediate as described in watchguard’s documentation listed below:
To mitigate the risks until upgrading to the latest version the CFC recommends:
• Ensuring network devices’ management interfaces are not exposed to the internet. • Ensuring strong authentication material, rotated regularly, on Firebox devices management interface. • Monitoring firewall management activities on Fireboxes that have not yet been updated
What the Cyber Fusion Center is doing
The CFC has created hunting campaigns and compiled IOCs to identify potential communication with known Cyclops Blink C2 servers.
Implementing a ZK-focused authenticated-encryption scheme
No items found.
Kudelski Security Team
In the last few years, several practitioners have proposed zk-focused cryptographic constructions such as hashing and encryption primitives that operate on binary and prime fields and that have a low multiplicative complexity. They are also called arithmetization-oriented primitives. Some examples are the Reinforced Concrete, Rescue and MiMC hashing functions. These constructions typically target zkSNARKs and STARKs -based applications.
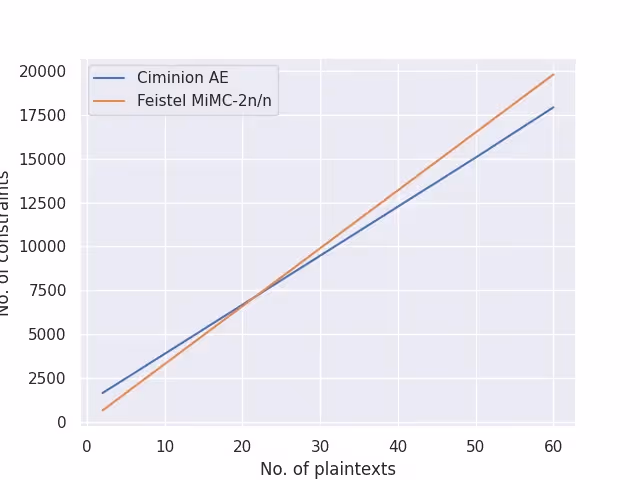
In this post, we focus on Ciminion, an authenticated-encryption scheme proposed by Dobraunig et al. and presented at EUROCRYPT 2021 and describe how it can be implemented using a domain specific language (DSL) for writing zkSNARKs circuits. Then, we compare our implementation with the MiMC cipher in Feistel mode (which uses a permutation that is widely used in circuits), and show how our Ciminion implementation outperforms it for a large number of plaintexts.
Introduction
zkSNARKs make it possible to convince another party that a particular statement is true restricting other information about the statement to a minimum. In this case, the statement consists on a deterministic arithmetic circuit with inputs and outputs. The recent availability of domain specific languages (DSLs) for creating zk-focused applications and circuits (some examples are circom2 and Leo) allows to speed-up the creation of privacy- friendly applications.
There are certain categories of applications that can be easily described using zkSNARKs:
Digital economy : Via zkSNARKs it is possible to prove that a person’s funds are higher than a certain value without revealing the exact amount and that this value belongs to a specific interval and has certain properties (think about a range proof with a greater degree of expressiveness). Further, by implementing a digital signature scheme such as ECDSA or EdDSA as a zkSNARK circuit, we can prove that a signing operation, described as a set of constraints, has been performed correctly.
Private authentication and authorization: Via zkSNARKs we can prove that we own a particular official identification document and that a certain field contains a specific value or lies in a particular interval and not revealing the rest of the fields of the document. In a way, we can obtain the same privacy capabilities that an attribute-based credential system provides. Moreover, proving that a value belong to a list of candidates without revealing it is easy to implement in a circuit and makes it possible to implement group-based authentication systems.
In this article, we focus on zkSNARKs DSLs, which provide a direct path for building privacy-friendly applications. We refer the reader to differentresources for learning the specifics of zkSNARKs, together with recent advances such as PlonKup, elastic SNARKs and Nova.
Describing circuits with a DSL
Using a DSL such as circom2, one can describe a zkSNARK as an arithmetic circuit with inputs (which can be private, public or a mix of both) and outputs. The circom2 compiler transforms the circuit description into a Rank-1 Constraint System (R1CS). Other tools such as snarkjs rely on the output of the circom2 compiler to provide the verifier and prover components that can be used to build applications based on zkSNARKs.
ZK-focused cryptographic primitives
Arithmetic operations in the circuit are always performed modulo a large prime and in the case of circom2, within the scalar field of the pairing-friendly curve BN2541 by default (whose security level was decreased to 103 bits in https://eprint.iacr.org/2019/885). However, it can be compiled to use the BLS-12-381 curve.
A zk-application might need to perform a hash operation, to encrypt a sensitive value or to derive an authentication tag of a message. Even if typical constructions such as SHA-3 and an AES modes could be implemented in a DSL, the performance in terms of number of constraints of the resulting circuits would be affected by schemes that rely on bitwise operations. For this reason, in the last few years several practitioners have proposed constructions such as the MiMC, Poseidon, and Rescue hashing algorithm and ciphers such as GMiMC and Ciminion. These constructions mainly operate on prime and binary fields and try to reduce the number of expensive arithmetic operations such as multiplications.
Ciminion
Ciminion is an authenticated-encryption scheme that was presented at EUROCRYPT 2021 by Dobraunig et al. It has been designed to target zero-knowledge proof applications such as zkSNARKs, STARKs and multi-party computation. It requires a limited number of field multiplication and it can be implemented over a prime field.
Ciminion reduces the amount of field multiplications by using the Toffoli gate and the Farfalle construction in order to minimize the number of rounds. In contrast, to other schemes such as MiMC that uses the power mapping f(x) = x^3, the Toffoli gate transforms a triple (a, b, c) into a triple (a, b, ab + c).
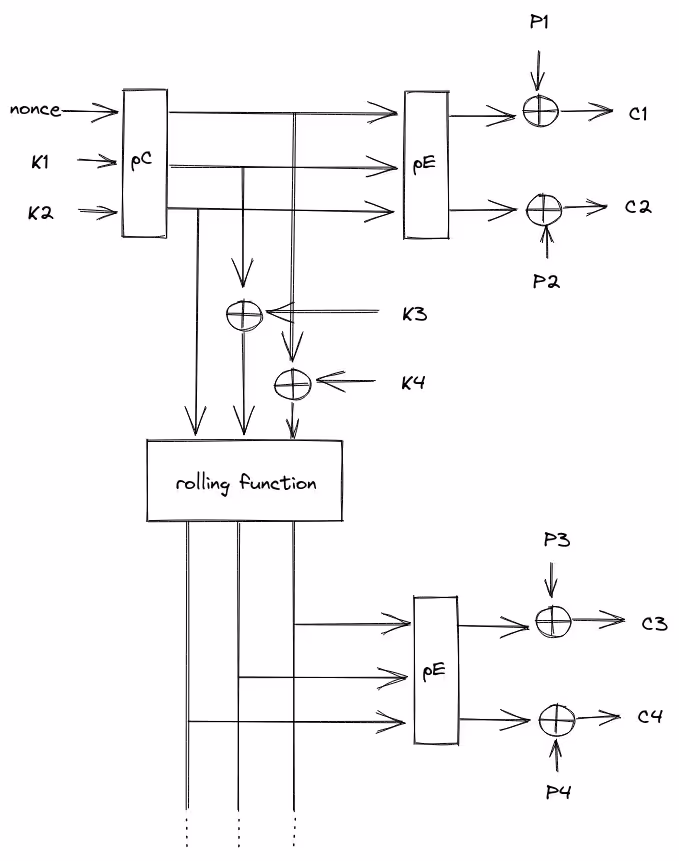
Farfalle is a permutation-based construction for a pseudorandom function (PRF) that focuses on parallelization and was designed by the Keccak Team in 2016. It typically uses a family of permutations with different number of rounds, and three layers: a mask derivation function, a compression layer (pC) and a expansion layer (pE). The Farfalle construction was designed with versatility in mind and can be transformed into an AE construction.
Ciminion structure and components
Ciminion receives the following input parameters: a nonce N and two subkeys (K_1 and K_2). It first applies the permutation pC to them and ouputs an intermediate state. Then, this state is transformed by the pE permutation. Two of the resulting elements are used to encrypt the first two plaintext elements P_1 and P_2. The rest of plaintext elements P_2i and P_2i+1 are processed as follows: another pair of subkey elements are added to the intermediate state. Then, the rolling function and the pE permutation are applied to obtain another two field elements that are finally used to encrypt the subsequent pair of plaintext field elements.
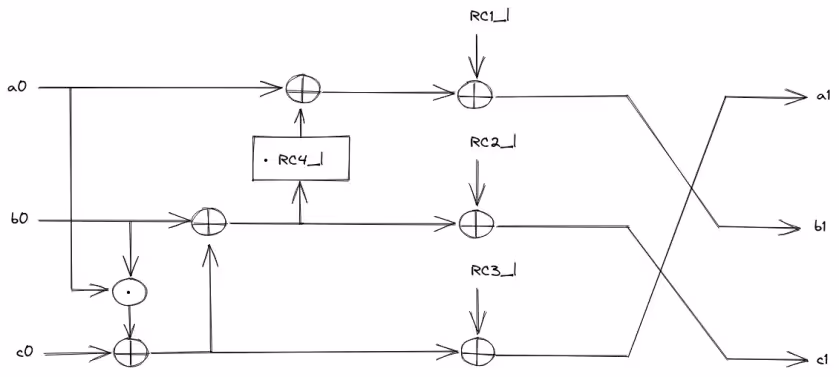
Both the pE and pC permutations transform a triple (a, b, c) using the round function with different number rounds:
The Ciminion round function, adapted from the original paper
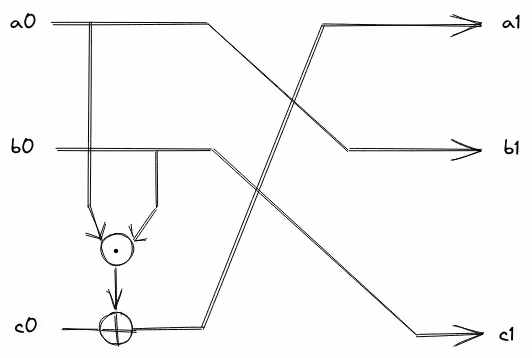
RC are the fixed round constants. They are generated using SHAKE-256 and can be precomputed before performing the authenticated-encryption operation. Finally, the rolling function performs the Toffoli gate operation:
The Ciminion rolling function, adapted from the original paper
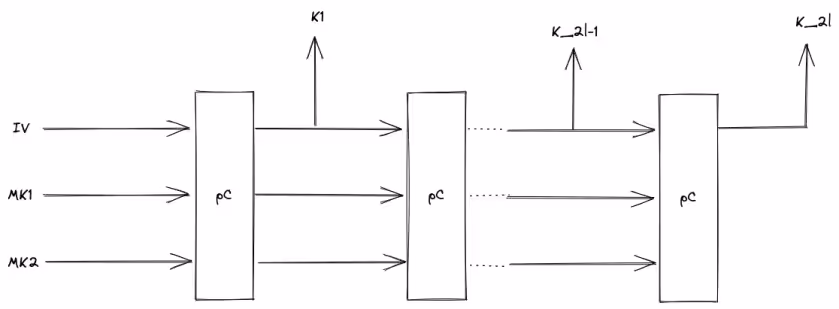
In Ciminion, a set of subketys needs to be generated for performing authenticated-encryption. This is performed using two master keys, MK1 and MK2 and a public IV. Ciminion expands the master key elements using a sponge construction that relies on the pC permutation:
SubKey generation in Ciminion, adapted from the original paper
Implementing Ciminion in circom2
For a given circuit written in circom2, the compiler generates the proof and a R1CS version of the circuit in the form of (A * B) – C = 0. Further, a zkSNARK implementation such as snarkjs can use either Groth16 or PLONK to verify the proof.
In circom2, each circuit is considered a component that can be imported in another circuit in a way that it is possible to generate a library of reusable gadgets such as circomlib. Constrains in the circom2 library are described using the “===” operator and by default, all the signals are private.
We refer the reader to the circom2 documentation for installation instructions and language details. We have found hardhat-circom and the circom2 syntax plugins for vscode and vim very useful.
The rolling function
In this section, we explain how to implement the Ciminion components in circom2.
First, we start with the smaller components and we start composing them in a bottom-up fashion til arriving at the Farfalle-like construction of Ciminion. The rolling function it is the simplest component operation of Ciminion. It just performs the Toffoli gate operation. This is a component with 3 inputs and 3 outputs, being the triple transformed the output:
pragma circom 2.0.3;

template Rolling() {
    signal input s0;
    signal input s1;
    signal input s2;

    signal output b0;
    signal output b1;
    signal output b2;

    b0 <== s2 + s0*s1;
    b1 <== s0;
    b2 <== s1;
}
The pC and pE permutations
The Ciminion round function involves the following inputs: the triple a, b, c (e.g. a_0, b_0, c_0), four round constants (e.g. RC_0, RC_1, RC_2, RC_3) and 3 outputs: a_1, b_1, c_1, that is, the output triple after performing the transformation operation. Then, we can instantiate the permutation (round function f_i) to create the iterated permutations pC and pE:
pragma circom 2.0.3;

template Permutation() {
    signal input a0;
    signal input b0;
    signal input c0;

    signal input RC0;
    signal input RC1;
    signal input RC2;
    signal input RC3;

    signal output a1;
    signal output b1;
    signal output c1;

    signal a0_mul_b0_plus_c0_plus_b0;

    a0_mul_b0_plus_c0_plus_b0 <== a0*b0 + c0 + b0;

    a1 <== c0 + a0*b0 + RC2;
    b1 <== a0 + RC3*(a0_mul_b0_plus_c0_plus_b0) + RC0;
    c1 <== a0_mul_b0_plus_c0_plus_b0 + RC1;
}
Once we have the permutation implemented, we only need to iterate during a specific a number of rounds and the corresponding list of round constants:
template IteratedPermutationN() {
    signal input a0;
    signal input b0;
    signal input c0;

    signal output a1;
    signal output b1;
    signal output c1;

    var c[536] = [
          292334644102394411537362212093572878140,
          250282066453690133315708418387534650045,
          25210252274841859825108081164557115781,
          16246747660448753010909888379129524409,
          131669148524554050620166690622542333908,
          73395003443371763039182051680716568403,
    [...]
Given a number of rounds nRounds per permutation, we instantiate one Permutation component per iteration (in circom2, a value can be assigned only once to a signal). The outputs of a permutation component i are redirected to the input of a permutation component i+1 and the final triple consists of the output of the permutation component nRounds – 1:
The key generation operation in Ciminion takes as input the IV and two master keys. It iterates the permutation pC (permutation N in the Ciminion reference code) on this input in order to generate the subkeys K_i. The output corresponds to the first value of the output triple (a1, b1, c1), that is a_i for subkey K_i. We can generate a component that is instantiate according to the number of sub keys e.g. nKeys:
pragma circom 2.0.3;

include "permutation.circom";

template KeySchedule(nKeys) {
    signal input s0;
    signal input s1;
    signal input s2;

    signal output keys[nKeys];
    component p_n[nKeys];

    for (var i=0; i<nKeys; i++) {
        p_n[i] = IteratedPermutationN();

        if (i == 0) {
            p_n[i].a0 <== s0;
            p_n[i].b0 <== s1;
            p_n[i].c0 <== s2;
        } else {
            p_n[i].a0 <== p_n[i-1].a1;
            p_n[i].b0 <== p_n[i-1].b1;
            p_n[i].c0 <== p_n[i-1].c1;
       }
       keys[i] <== p_n[i].a1;
    }
}
The Farfalle-like structure
Finally, we have all the components to generate the authenticated-encryption primitive.
This component will use:
the key generation component to generate the nSubKeys subkeys.
the permutations pC and pE
the rolling function
the MAC generation algorithm for a given ciphertext
We receive as inputs: the nonce and the two master key elements, nPairs of plaintexts and we output: a TAG element that authenticates nPairs of ciphertexts:
template CiminionEnc(nPairs) {

    var nSubKeys = 2*nPairs + 3;

    signal input MK_0;
    signal input MK_1;
    signal input nonce;

    signal input PT[nPairs*2];
    signal output CT[nPairs*2];
    signal output TAG;
The first part of the encryption operation starts the key schedule:
Then, the permutation pC is applied to the supplied nonce and to the first pair of subkeys. Then, for each pair of plaintexts, the rolling and pE permutation are applied:
circom2 allows to debug and test a circuit implementation via Mocha. In this section, we show how we could test the Ciminion implementation that we have created. First, we’ll need to declare a main component in the circuit description that we want to test. We start with the Ciminion rolling function:
component main = Rolling();
Via the ffjavascript package we can perform finite field arithmetic operations within the BN254 curve scalar field and can compare the results. For instance, we can generate random inputs for the Ciminion rolling function and execute the function in JavaScript:
$ mocha rolling.js
Rolling function ✔ Conformancetest (47ms)
1 passing (52ms)
Finally, we can also test that encryption was performed correctly by decrypting the result. In that case, we can first write a circuit that decrypts a set of ciphertexts and call both circuits from mocha.
In order to reverse the encryption operation, we need to obtain the plaintexts as:
We have compared the number of constraints required for implementing Ciminion with those of MiMC in encryption mode (particulary Feistel MiMC-2n/n). The MiMC construction is typically used in circom2 circuits. We see that Ciminion scales better for larger plaintexts, due to the utilization of the Farfalle construction in comparison to the MiMC construction based on the Feistel structure.
We have released the code and tests utilized in this article in our GitHub repository.
Acknowledgments
Part of this work was done during the 2nd 0xPARC Learning Group.
Notes
1The BN254 curve security level has been estimated in around 103 bits at the time of writing this post. See https://eprint.iacr.org/2022/586.
Last update: 14th July 2022
2022
Security Advisory
April 25, 2022
“INCONTROLLER” / “PIPEDREAM” ICS Toolkit Targeting Energy Sector
No items found.
Kudelski Security Team
This advisory was written by Travis Holland and Eric Dodge of the Kudelski Security Threat Detection & Research Team
Summary
Incontroller/Pipedream is a collection of sophisticated tools thought to be created by group dubbed “Chernovite” by Dragos. Chernovite is assessed to be a a state-sponsored adversary, with the intention for use in future operations. The primary focus for this toolkit is for use in the electric and natural gas verticals; however, it is not limited to solely those. At this time, the CFC has no intelligence that Pipedream has been successfully deployed in the wild at this time. This has provided researchers time to evaluate the tools proactively. This is a suite of utilities designed to allow for access to and manipulation of Schneider Electric and Omron PLCs, as well as Open Platform Communications (OPC) Unified Architecture OPC-UA servers. Dragos, an ICS focused cyber security company, has broken Incontroller/Pipedream into five categories: Evilscholar, Badomen, Mousehole, Dusttunnel and Lazycargo.
Evilscholar: Provides the capabilities to discover, access and manipulate Schneider Electric PLCs.
Badomen: Provides the capability to scan, identify and access Omron software and PLCs.
Mousehole: The tool is designed around interacting and accessing OPC Unified Architecture (UA) servers which allow for enumerating nodeids and brute forcing credentials.
Dusttunnel: Remote operation implant to establish persistence and command and control.
Lazycargo: Interface that drops and exploits a known vulnerable ASRock driver to elevate credentials.
When properly used these tools allow for an attacked to scan for devices, brute force passwords, close connections, and even crash the targeted device. PLC implants are utilized to execute untrusted code from the PLCs, these implants could be on an impacted PLC for long durations, requiring firmware forensic analysis to reveal its presence.
The CFC has worked with its ICS-aware Network intrusion Detection System (IDS) partner, Claroty, who has written and published detection signature for PipeDream. All clients of the CFC’s MDR for O.T have had these signatures updated for their Claroty deployments.
Affected Systems
This impacts the following systems typically located in electrical substations and communicating through IEC-104 protocol:
Systems vulnerable to CVE-2020-15368; ASRock driver exploit
Schneider Electric MODICON and MODICON Nano PLCs, including (but may not be limited to):
TM251, TM241, M258, M238, LMC058, and LMC078
OMRON Sysmac NJ and NX PLCs, including (but may not be limited to):
NEX NX1P2, NX-SL3300, NX-ECC203, NJ501-1300, S8VK, and R88D-1SN10F-ECT
Incontroller/Pipedream is a sophisticated and modular set of tools that an attacker can leverage once they have established access within an environment. The foothold is established by any vector available to the attacker and is followed up with utilization of the ASRock driver exploit (CVE-2020-15368) to further escalate their privileges, and to move through the environment. The ASRock exploit is rather trivial, and only requires administrative access to further escalate privileges and execute arbitrary code with kernel privileges.
The modular architecture and automation of the tool allows for easy addition of more components as needed (such the ASRock exploit) could easily be swapped in favor of another exploit or tool. Depending on the PLC type there are different actions and objectives that the threat actor would look to achieve.
Capabilities of the tooling per impacted vendor
Schneider Electric Devices:
Rapidly scan and identify all Schneider PLC’s on other network via UDP multicast over port 27127
Brute force Schneider PLC passwords via CODESYS over port 1740
Conduct denial-of-service attacks to prevent network communication to the PLC
Drop connections, forcing re-authentication to the PLC to gather credentials
Crash the PLC, for a power cycle and configuration recovery
Pushing custom Modbus commands/packets
Retrieving file/directory listings
Deleting files
Adding a route if the device gateway IP exists on a different interface
Connecting to specific devices
Omron devices:
Scanning for Omron via FINS protocol over port 9600
Parsing out HTTP response from Omron devices
Retrieving MAC addresses of devices
Polling for what devices are connected to the PLC
Backup and restoration of arbitrary files to or from the PLC
Loading custom agents on the PLCs to allow for additional capabilities
Wiping the device’s memory and resetting it
Activating the Telnet daemon
Connecting to the device via the Telnet daemon and uploading or executing payloads and commands
Perform a network capture
Killing processes on the device
Transferring files to the device
Connecting and communicating with attached servo drives
OPC UA:
Identify OPC UA servers
Connect to OPC UA servers via default or compromised credentials
Reading/Writing tag values for data on OPC UA servers
Brute forcing credentials
Outputting log files
Currently Known Indicators of Compromise (IOCs)
RwDrv.sys (RWEverything)
AsrDrv104.sys (AsrPolychromeRGB)
AsrDrv103.sys (AsrPolychromeRGB)
ProcessHacker.exe
Solution/Mitigation
There is currently no evidence of Incontroller/PipeDream being deployed for disruptive or destructive effects. It is known to utilize standard ICS protocols and actions to live off the land natively. Proper monitoring of any suspicious use of the ASRock driver can help mitigate a portion of the toolset seen within Incontroller/PipeDream. It is important to note that utilization of the AsRock Driver exploit requires the attacker to already have administrator level privileges on the host, however, future exploits may have different requirements.
The Cyber Fusion Center recommends the following for mitigation, discovery, and recovery:
Appropriate network segmentation, and strong perimeter controls
Leverage Secure Remote Access with Multi Factor Authentication and monitored sessions
Jump Servers monitored with Endpoint Detection and Response (EDR) technologies
Active endpoint monitoring on HMIs, Engineering Workstations, and Historians
Strong password policies and management
Patch management
Only allow connection to ICS/SCADA infrastructure through certain engineer workstations
Disable the Schneider NetManage discovery service
Monitoring for new outbound connections from PLC’s
Additionally dedicated ICS monitoring can aid in quickly identifying things outside the baseline that could be indicative of movement and attacks within the ICS infrastructure. Examination of non-baseline activity, and restricting access to the following destination ports:
TCP 502; Modbus
UDP 27127; primarily used for discovery scanning
UDP 1740-1743, TCP 1105, and TCP 117470; CODESYS
TCP/UDP 9600; default communication port for Omron
What the Cyber Fusion Center is doing
While there are currently no known active deployments of this tooling, the Cyber Fusion Center’s O.T Intrusion Detection System (IDS) partner, Claroty, has developed and published network signatures designed to detect the potential presence of this tooling. All clients of the CFC’s MDR For O.T service have had these new detection signatures deployed on their behalf.
Lapsus$ Threat Actor Demonstrates Access to Backend Okta Tooling
No items found.
Kudelski Security Team
Summary
Okta is one of the premier identity providers in the World and is trusted by thousands of customers. The recently known Lapsus$ threat actor group, that has been very active lately targeting Microsoft and Nvidia, has allegedly breached Okta’s customers environments. The group published screenshots of environments that they were able to access. The threat actor claims that they have acquired full admin access to Okta.com and they also claim that “our focus was ONLY on Okta customers”.
While Okta has confirmed that an attempt to breach Okta in late January 2022 was investigated and contained at the time, Okta has now acknowledged that after thorough investigation they have currently identified approximately 2.5% of their customers who have been impacted thus far.
Only customers of the “core” Okta product are possibly impacted, there is no impact to Auth0 customers, nor to customers leverage their HIPAA and FedRAMP certified platforms. Okta said that the impacted customers have already been contacted by email.
Finally, Okta’s investigation showed that during a five-day window of time (Jan 16-21, 2022) the threat actor had access to a third party (contractor) support engineer’s laptop. The impact is limited to the access of the support engineer. Support engineers have access to limited data like Jira tickets or list of users and can reset passwords, multi-factor authentication (MFA). But Okta confirmed that they are unable to create and delete users, neither are they able obtain those passwords or download customers databases.
What the CFC recommends
If your organization is using Okta and has been notified by Okta that you are impacted, the CFC strongly recommends contacting your incident response partner to help understand the potential extent of the attack campaign.
We also recommend quickly suspending accounts that may have had their credentials or MFA devices reset by the threat actors prior to validating that such access has not been abused by the threat actor.
Even if Okta has not identified that you are an impacted customer, the CFC strongly recommends that all Okta customers take the following actions:
Search the Okta system logs for signs of compromise since January 16, either in a SIEM or directly in Okta logs. This can include things like password change or MFA device or token updates.
The MDR Detection Engineering and IR teams recommend searching for the following event types:
user.account.reset_password
user.mfa.factor.update
system.mfa.factor.deactivate
user.mfa.attempt_bypass
user.session.impersonation.initiate
Compile a list of accounts that were found in Okta since the beginning of 2022 and review with the owners of the accounts whether those changes are legitimate
Follow best practices regarding identity management with a specific focus to MFA
What is the CFC doing?
The CFC leverages Auth0 as a Multi-Factor and Authorization provider. Due to these events the CFC is closely working with Auth0 to ensure our internal users are not impacted. The Kudelski Security DevOps and Security Engineering team has worked with Okta to confirm that this time Auth0 platform is not known to be impacted by these events.
However, although Okta has not yet identified any suspicious activity with regards to the Auth0 platform, the Kudelski Security has worked to ensure no suspicious activity was identified with regards to user MFA devices.
Additionally, it’s important to note that the CFC does not leverage Auth0 to store internal user credentials. Auth0 is used to provide Multi-Factor Authentication and Authorization to provide access to internal CFC systems and infrastructure. This dual vendor strategy ensures that no single vendor is a single point of failure. Successful compromise of the CFC’s environment would require that a threat actor compromise both the CFC’s identity and credential provider (Azure Active Directory) and Auth0 in order to gain access to internal CFC systems or that threat actors active a “single vendor” break the glass scenario that would notify the Kudelski Security DevOps team. No such activity has been identified.
The CFC will continue to monitor the situation and will provide updates to clients as more information is available. At this time, there is no indication that the CFC’s Auth0 deployment has been affected and no indication that a threat actor has been able to reset MFA devices.
CFC Response to Russia / Ukraine Tensions and Potential Cyber-Attacks in Retaliation to Western Sanctions
No items found.
Kudelski Security Team
As the current situation continues to evolve, the Kudelski Security Cyber Fusion Center is continuously adapting our response to events, intelligence, and new details being released. For details on how the CFC is responding to newly released information, please review the following updates.
Notified Vulnerability Scanning Clients of Newly Identified Vulnerabilities Known to be Actively Exploited
On March 3rd, the United States Cybersecurity and Infrastructure Security Agency (CISA) updated their catalog of known commonly exploited vulnerabilities and added 95 new entries after increased analysis of suspected Russian intrusions. The bulk of these newly added vulnerabilities appear to have been actively exploited by Russian threat actors, and as such, should be prioritized for remediation. In response to this new set of known exploited vulnerabilities, the CFC has reviewed vulnerabilities found for clients of the Kudelski Security’s Vulnerability Scanning Service, the CFC proactively updated all impacted clients with the list of known exploited vulnerabilities on their internet-exposed systems.
2. Fine Tuning of Volume Shadow Copy (VSC) Auditing for MDR For Endpoint clients with CrowdStrike Falcon
For clients of the CFC’s MDR for Endpoints service, the CFC continues to fine tune the extra visibility on enabled to identify tampering with Windows Volume Shadow Copy (VSC) “backups”. The CFC has analyzed and reviewed all alerts generated and is working with clients for to gather additional input regarding the legitimacy of the activity observed. The CFC will await client’s feedback in order to fine tune configurations prior to enabling the VSC deletion features in order minimize disruption of any legitimate activity.
3. Analysis and Vigilance of New WMI and SMB Worm used to deploy HermetricWiper in Ukraine
The CFC has continued to monitor information and research about the malicious software deployed against Ukraine. As part of this monitoring, the Kudelski Security Detection Engineering team analyzed the worm component named “HermeticWizzard” to ensure the CFC’s security analysis team remained informed about how destructive attacks against Ukraine were carried out. As an example of this analysis, the following diagram was created by our team describing the logic and potential indicators of compromise of this new worm component:
4. Validation of Newly Deployed Claroty Signatures for MDR for O.T Clients
For our MDR for O.T clients, on February 27th, Claroty released a new threat bundle that included new and updated detections for HermeticWiper and additional detections for newly discovered malware dubbed “SockDetour”. SockDetour is a highly stealthy malware used as a secondary implant on compromised Windows servers since at least July 2019. As we already ensured all our Claroty Continuous Threat Detection (CTD) deployments are configured to receive automatic signature updates, all MDR for O.T. clients have already benefitted from these extra detection capabilities.
5. Continuous Vigilance and Advisory Development
In addition to the previous measures, the CFC released an advisory on Cyclops Blink, a new malware that appears to be a replacement of the previously discovered and documented VPNFilter malware. While Cyclops Blink is known to only target SOHO devices from WatchGuard so far, an assessment of the malware reveals that it could also be compiled and deployed onto other architectures and SOHO networking equipment. This information leads CFC to continuously monitor this threat and its evolution in order to identify potentially infected system and provide clients with mitigation and remediation steps as soon as possible.
Summary
As communicated previously, the Kudelski Security Cyber Fusion Center is aware of and actively monitoring the current global tensions resulting from the events surrounding Russia and Ukraine. The United States Cybersecurity and Infrastructure Security Agency (CISA) has published an advisory regarding potential Russian attempts to utilize cyber-attacks for force projection and as a response to western sanctions.
There are currently no specific threats targeting the United States, other NATO members or partner countries. However, Russian interests have recently expressed discontent with ongoing sanctions and have shown willingness to target “sensitive” assets. Additionally, the CFC is aware of several cyber-criminal groups (such as the Conti ransomware group) who have pledged to attack critical infrastructure of “Russian enemies” in the event that a cyber-attack is launched against Russia. In light of these threats and the ongoing situation with Ukraine, the Cyber Fusion Center is operating with increased vigilance and is actively monitoring for potential cyber-attack related activity as part of these increased tensions. This increased vigilance will continue until tensions ease.
Additionally, the CFC is aware of active deployment of data wipers (dubbed “HermeticWiper”) being discovered and potentially deployed in critical infrastructure within Ukraine. These wipers have also been discovered on systems of Ukrainian government contractors based in Latvia and Lithuania.
The CFC will continue to monitor the situation and provide our CFC analyst team and clients any additional technical and cyber security related insights.
What the Cyber Fusion Center is doing
1. Identified Known Exploited Vulnerabilities discovered on vulnerability scanning client perimeters
For clients using Kudelski Security’s Vulnerability Scanning Service, the CFC has proactively reviewed vulnerability scan results for internet-exposed systems for vulnerabilities that are known to be actively exploited, according to CISA.
The CFC has prioritized identifying vulnerabilities known to be used by Russian Threat Actors. For clients who have known exploited vulnerabilities on their internet perimeter, the CFC has opened cases to communicate which assets may be vulnerable and should be remediated as soon possible.
Cyber Fusion Center strongly suggests clients who use the Kudelski Security Vulnerability Scanning service to validate their vulnerability scanning scope to ensure all internet facing assets are being properly scanned.
2. Enabling Additional visibility into wiper and ransomware technical precursors or MDR for Endpoint clients
Based on guidance from our Detection Engineering and Incident Response organizations, the CFC is working to enable additional CrowdStrike visibility (Volume Shadow Copy – Audit) for technical precursors of ransomware across the client base. As this additional audit visibility may generate false positive CrowdStrike detections, the CFC will be investigating all volume shadow copy related activity, escalating activity believed to be suspicious, and tuning as appropriate.
The CFC will monitor for the effects of the auditing policy mentioned above, and for clients with CrowdStrike’s Prevent module, the CFC may recommend enabling specific Crowdstrike features that prevent the deletion of Windows “backups” (volume shadow copies). The CFC will communicate with clients and get approval prior to enabling any preventative controls.
Note: No additional auditing is currently required for clients with Microsoft Defender for Endpoint.
3. Enabling automatic updates of Claroty threat detection signatures for MDR for O.T clients
The CFC has worked to ensure all Claroty Continuous Threat Detection (CTD) deployments are configured to receive automatic updates to passive Claroty threat signatures. Additionally, we’ve worked with Claroty to confirm that the Claroty team will release additional threat signatures as the situation evolves.
4. Continuous monitoring and vigilance
The Kudelski Security Incident Response, Detection Engineering, and Cyber Fusion Center teams continues to monitor events and provide guidance to both our clients and the CFC.
Please note that that the CFC is working diligently to provide the best detection and response capabilities possible during this time of heighten tension. However, some of the activities performed in order to provide better service may lead to an increased number of security events that need to be triaged and investigated on your behalf by the CFC.
This bulletin and guidance will be updated as the situation develops.
Hello Web3/blockchain world, great job. You got people to take you seriously, trusting your projects and investing their money. You’ve sold people on your innovations, and people believe in your projects. Mission accomplished. But with great trust comes great responsibility. It’s time to learn valuable lessons from other areas that have gone before you, the most valuable is that security isn’t a task; it’s a process.
With this post, I hope to add some clarity, both for blockchain projects and security professionals who may be new to the space. This is a bit of a quick mental dump and far from being comprehensive, but I hope it’s the start of a conversation between both the blockchain and security communities.
Blockchains and Security
As an outsider looking at the current state of security with blockchains, it seems as though blockchain projects don’t take security seriously. Nothing could be further from the truth. Blockchain projects take security very seriously and understand the impacts of a compromise, and as such, having a security audit has become a blockchain rite of passage. So then, if that’s the case, then why are things the way they are? We’ll get to that in a second, but let’s take a quick detour and talk about security professionals for a moment.
Security Professional Baggage
When experienced security professionals discover the Web3 space, they bring a lot of baggage. They look at recent attacks and assume either the project didn’t have an audit or the auditor didn’t do a good job. This perspective makes an awful lot of assumptions that other processes and procedures were in place. We’ve learned a lot about application security over the past 20 years, but those lessons learned either aren’t applied or don’t directly map to the blockchain space. So, the project may very well have had an audit, but two days after the audit was completed, they pushed vulnerable code to their project. One-shot audits can’t solve that problem.
I also get the feeling from talking with security professionals that they know that blockchain ecosystems are different, but they think they have more in common than they do. So, they may understand that Ethereum, Solana, Algorand, etc., are different, but with minimal tweaking, your expertise on one will apply to the other. This isn’t true, and there’s quite a bit of hidden complexity, especially if you are developing projects on multiple chains or cross-chain projects. Different chains have different value propositions and ways of implementing that value, and it’s easy to make simple mistakes with catastrophic consequences.
Blockchain Projects
Notice I used the term “projects” instead of “companies.” This is very purposeful. Blockchains have unique communities and projects. There’s a culture, much like security communities. They have their own language and views of the world. This can be a challenge for traditional security companies. I mean, try explaining to your accounting department that someone named HODLKing40 would like to pay for an audit.
Many of these projects may have an organization behind them for initial development and launching, but the projects are meant to be owned by the community. It may also be the case that these organizations are just three people. This is an entirely different perspective than what we are used to in the enterprise security space, but it’s essential to keep in mind as you work with the community.
How Did We Get Here?
If I summed up the current state of blockchain security, it would be projects operating with low security maturity. Their view of security is performing a single security audit before launch. Given that these projects are being developed in full public view and used as though they were finished products, this lack of maturity is on full public display.
There was also the early perspective of, “since it uses cryptography, it must be secure.” This view fueled some of the early lack of focus on security.
Hackathons and Side Hustles
Many projects are created during hackathons or as people’s side hustles. Some blockchain developers are new to development altogether and working on their very first project. It’s part of what’s exciting about the space, but these aren’t conditions ripe for security success. As a developer working for a traditional company, there are typically guardrails in place, and (hopefully) you’d be exposed to some structure, standards, and ongoing audit activities. With no previous experience, developers are left to fail in full public view.
More Than Just Blockchain Security
It gets more complicated because Web3 developers need to get both blockchain and traditional security right to succeed. This is because there are traditional applications mixed in as well. Think about a web front-end for an NFT marketplace or a wallet implemented as a browser extension.
Developers may also be writing complex financial products that are quite unlike anything they’ve developed before. There are many ways to mess things up and only one way to do it right. This environment creates an instant high-value target for attackers. Then again, you can also mess things up without an attacker in the loop as well. In the blockchain space, both can have similar outcomes.
We tend to forget that we are seeing technology experiments playing out in public. We think of them as finished products because the user base is high, and there is so much money at stake. This is similar to traditional startups that operate in stealth mode, blitzscaling features into their product. Traditional startups can also exercise a low level of security maturity, but because they are developed in private, with controlled releases, their lack of security maturity isn’t on full display. It also buys them time to fix issues when identified before they are disclosed publicly.
Impacts of Failure
The impacts of hacks in the blockchain space are also higher than many traditional applications. Traditional applications typically have a breadth of features and functionality. Breaches are undoubtedly bad, but most can recover, and there may be layered protections, and resolutions users can take because these traditional systems are centralized.
With blockchain systems, hacks can be irreversible. Blockchain applications and smart contracts are typically very focused on specific functionality, so a violation of that functionality means a complete compromise. Exploiting once basically exploits everywhere without needing to actually go everywhere.
New Ways Of Operating
The experimentation in the space isn’t constrained to the technology. Blockchain ecosystems are also experimenting with new ways to create and run organizations, leaving logistics and critical decisions up to their communities. In some cases, this means even exercising radical transparency. You may find that one of your statements of work ends up on Reddit with the user community voting on whether to go with your company or not.
Transparency is one of the great things about the blockchain space, but you can’t have both radical transparency and security. Sorry. This could only work in a world where nobody acts maliciously—for example, having all of your development and bug reporting open to the world regardless of severity. If someone points out a high severity bug directly on your public GitHub repo, it’s possible an attacker could exploit the issue before you’ve even written a fix. Given the stakes, this is a bad proposition.
What Needs To Happen
In a nutshell, we need greater maturity in the space, both from blockchain and security professionals.
Security Professionals
Security professionals can’t pretend blockchains are irrelevant. I know fights with the NFT community are fun, but we’ll have to put that aside. Part of why we are where we are is because the security community has been relatively disengaged. Let’s not continue to be the “There is no cloud, just someone else’s computer” people. That mindset didn’t work out so well for us in the past.
I also get the feeling from some that they have the perspective that if they don’t participate in security conversations on the topic, they are somehow accelerating the demise of the technology. This isn’t the case either.
There are some common themes when an emerging technology comes along. Developers of the new technology don’t implement security lessons from other disciplines, but security professionals want to implement everything we’ve learned. We need to realize that we can’t re-use the exact same approaches we’ve used with traditional enterprises. I mean, there’s no risk mitigation to losing all of your money, and scanning tools won’t solve the most significant challenges.
Treat your initial plunge as an exploratory journey. Look at different security issues that have manifested themselves in the past, be they with smart contracts or core blockchains. These projects are mostly open, so you can look at their Github issues and patches. Review vulnerability write-ups and deconstructions of previous attacks. Projects affected by a compromise will typically post detailed write-ups. It’s a start.
Blockchain Developers
Blockchain developers need to understand that what they are building is laced with landmines, and every line of code is a potential hazard. As of today, it’s impossible to write bug-free software. This thought should be on every developer’s mind from the very start. Blockchain developers need to take a greater security responsibility and not just hope that any security issues are caught during a final audit. An audit should absolutely be part of the security process, but not the only part.
An important consideration is that different ecosystem layers have different threats and concerns. For example, a core blockchain has different security considerations than a developer writing an application to run on top of a chain. A centralized exchange has different concerns than a group participating in a DAO. No quick blog post is going to solve all of these issues. Specifics will have to be outlined by the communities themselves, given the differences between ecosystems, but since this is a conversation starter, here are some of my thoughts.
Security From The Start
Security is a process, not a step, and needs to be considered from the start. One obvious place to start is with the security evaluation of the architecture of a system. An architecture that doesn’t consider security is hard to apply security measures to after the fact. Blockchain ecosystems can be complex, and it’s difficult, if not impossible, to update later.
Developers also need to evaluate threats during their development process. Call it threat modeling, threat assessment, or whatever, having developers think about what could go wrong is necessary for making sure things don’t go wrong. Developers should look at the highest impact areas in their code, such as ownership checks, transfers, minting, etc.
Threat modeling could start simply by using the core questions of the Threat Modeling Manifesto while performing development tasks.
What are we working on?
What could go wrong?
What are we going to do about it?
Did we do a good job? The last question is something you have to get right. With the impact of failure so high, you can’t afford to find that out in production.
Tools will help, but they won’t solve all of the issues. This is one point traditional and Web3 applications have in common.
The bottom line is that you’ll need security expertise to get this off the ground. If you don’t have that expertise available, you can engage a partner or consider hiring someone to focus on these issues.
Ongoing Security Processes
Security isn’t something you finish. The entire design and development process should consider questions about risk and security. Make security and ongoing conversation. Recurring audits, either by a trusted partner, pair programming, community representative, etc., should be conducted.
Code additions, be they through dedicated developers or community contributions, should be evaluated for security scrutiny and focus on high-value functions keeping your threat model in mind.
And, of course, continue threat modeling. This should never stop.
Published Security Guidance
Projects and chains should publish clear security guidance for developers on their platforms. This guidance should outline things that are considered unsafe and warn developers of potential landmines. This guidance should be followed up with other awareness activities such as webcasts, workshops, etc. Security guidance should be updated as new attack vectors are discovered. This won’t stop developers from creating vulnerabilities but may reduce the obviously dangerous mistakes.
Process for reporting vulnerabilities
A clear process for reporting potential vulnerabilities should be published. Details of issues, especially for critical vulnerabilities, should not be public. Code fixes should also not be made public until they’ve been applied to the running code. The goal here is to reduce the window for exploitation to a size where, once an attacker finds out, they won’t have time to exploit.
A bug bounty program can also be part of this process to entice people to disclose bugs responsibly. Offering rewards upfront is better than begging attackers to give back what they stole.
Final Thoughts
I hope this post starts some conversations and explains a bit about how we got where we are. The recommendations made here are only a simple start. There is much more work to be done. The Web3 space is a challenging place to apply security, something that should get security professionals excited. If we do this right, there may be lessons we can apply back to traditional application security as well.
2022
Hacking
February 6, 2022
Quick Analysis of the Wormhole attack
No items found.
Kudelski Security Team
Summary
An anonymous attacker used a verification problem in the Wormhole program and 80000 wETH were pulled out of the Wormhole contract. The problem was the usage of instruction load_instruction_at in function verify_signatures of the Wormhole program. After changing the signature of a malicious message, the attacker was able to transferred from Solana tokens which were identical to legitimate tokens through the Wormhole bridge to Ethereum.
What happened
Wormhole Bridge is a bridge between blockchains, it allows for transferring assets from one blockchain to another. More precisely, it is a token bridge and a NFT bridge. Tokens are created in each chain, for example, on Ethereum they are ERC20 and on Solana they are SPL tokens. In addition, a smart contract (or program on Solana) manage each token on each chain. On Solana, the Wormhole program is deployed here. The BPF bytecode is available but also the source code is written in Rust and open-source.
Above that, Guardians manage transactions between each blockchain. Before transferring the token to another chain, They check that minted tokens were correctly generated by verifying their signature on secp256k1 curve.
. Basically, the wormhole program obtains the set of signatures from the prior instruction via the instruction sysvar program (in which its address is inputted by the user).
However, the verify_signatures function used the load_instruction_at function which outputs an instruction that is derived from the input data (which is the data of the instruction sysvar account). This function does not check if the input sysvar program account is the real sysvar account. Basically, the instruction sysvar program was never checked.
let secp_ix = solana_program::sysvar::instructions::load_instruction_at(
    secp_ix_index as usize,
    &accs.instruction_acc.try_borrow_mut_data()?,
)
for s in sig_infos {
    if s.signer_index > accs.guardian_set.num_guardians() {
        return Err(ProgramError::InvalidArgument.into());
    }

    if s.sig_index + 1 > sig_len {
        return Err(ProgramError::InvalidArgument.into());
    }

    let key = accs.guardian_set.keys[s.signer_index as usize];
    // Check key in ix
    if key != secp_ixs[s.sig_index as usize].address {
        return Err(ProgramError::InvalidArgument.into());
    }

    // Overwritten content should be zeros except double signs by the signer or harmless replays
    accs.signature_set.signatures[s.signer_index as usize] = true;
}
Once a signature_set is created, the function post_vaa will check if it has enough number of signatures to reach the consensus to post a Validator Action Approval (VAA). Now the attacker has a valid VAA and can trigger an unauthorized mint to his own account.
   let signature_count: usize = accs.signature_set.signatures.iter().filter(|v| **v).count();
// Calculate how many signatures are required to reach consensus. This calculation is in
// expanded form to ease auditing.
let required_consensus_count = {
    let len = accs.guardian_set.keys.len();
    // Fixed point number transformation with one decimal to deal with rounding.
    let len = (len * 10) / 3;
    // Multiplication by two to get a 2/3 quorum.
    let len = len * 2;
    // Division to bring number back into range.
    len / 10 + 1
};

if signature_count < required_consensus_count {
    return Err(PostVAAConsensusFailed.into());
}
The attack on Wormhole is the second-largest reported hack after Poly Network (https://research.kudelskisecurity.com/2021/08/12/the-poly-network-hack-explained/). The attacker was able to steal crypto-assets worth $324 million because of just a missing check. This is again a costly lesson for all blockchain developers, especially for Solana program developers.
Timeline
2021.10.20 06:01: Solana commit to deprecate load_instruction_at.
2022.01.13 14:29: Wormhole commit to update to Solana to 1.9.4.
2022.02.02 17:31: Pull request of the Solana update commit.
2022.02.02 18:24: Transaction to mint 120000 wormhole ETH on Solana.
2022.02.02 18:28: Transaction to pull out 80000 wETH from wormhole smart contract.
Previous analysis
Our analysis tried to summarize and give a bit of context of the previous analysis reported during the first hours of the hack:
Post written by: Tuyet Duong and Sylvain Pelissier
2022
Blockchain
November 18, 2021
Security Assessment of Marinade Finance on Solana
No items found.
Kudelski Security Team
Marinade is the “easiest way to stake Solana” and is a liquid staking protocol built on Solana where people can stake, use automated staking strategies, and receive tokens they can use to work within DeFi systems or swap back and unstake. The programs are written primarily in Rust.
For this blog, we will discuss the work executed during our security assessment for the Marinade team in 2021.
For a more in-depth overview of Marinade and its roadmap, please see Marinade’s documentation page here.
To begin, Marinade talked with us through their repository, as well as design and medium blog as displayed:
Our assessment focused on code committed as of October 15, 2021 and focused on the following objectives:
To help the Client to better understand its security posture on the external perimeter and identify risks in its deployed chain & contract infrastructure.
To provide a professional opinion on the maturity, adequacy, and efficiency of the security measures that are in place.
To identify potential issues, including loss of funds scenarios, and include improvement recommendations based on the result of our tests.
There is a focused methodology that we follow in reviewing solutions such as Marinade. Not only do we review a threat assessment of possible exploits of the system, but we conduct a review of the code, appropriate usage of the SPL, fund loss scenarios, and program authentication scenarios and components. In all situations, the Marinade solution met our requirements for an effectively implemented product, including resolving any findings we uncovered.
In the security report, we identified (1) MEDIUM, (1) LOW, and (1) INFORMATIONAL finding.
After finalizing the assessment, we verified these few initial weaknesses in the code-base, but did not find any critical fund-loss weaknesses or staking issues and the team quickly resolved any findings in the code to our satisfaction prior to deployment.
It was a pleasure working with the Marinade and are looking forward to working with them again in the future.
Attribute-based encryption (ABE) provides fine-grained access control on data where the ability to decrypt a ciphertext is determined by the attributes owned by a user of the system. Hence, data can be stored by an entity that is not necessarily trusted to enforce access control.
ABE has been proposed to secure the Internet of Things and enforce authorization in Cloud systems. This is typically exemplified in the healthcare setting, where all “nurses” of the hospital “A” can only decrypt certain records whereas “doctors” of the same hospital have access to additional information about the patients.
In this type of deployment, the following parties are involved:
Key generation authorities (KGAs): They setup and deploy the system and register the users of the system.
Data owners: They encrypt sensitive data using user’s encryption keys according to a certain policy.
Users: They register in the system, and receive a set of attributes. They can decrypt data according to their attributes.
Typically ABE schemes are based on pairings (albeit some new schemes based on lattice assumptions have appeared in the last few years), since it is generally known that secure schemes only based on ECC assumptions (such as DDH) do not exist.
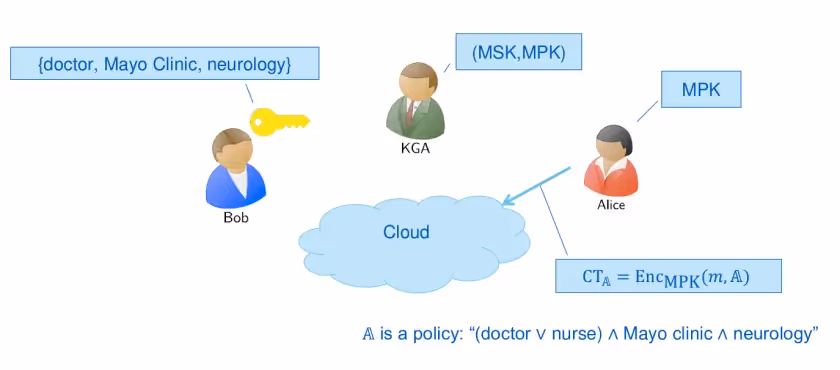
For instance, in the example below, Bob has the following attributes: “doctor”, “Mayo Clinic” and “neurology”. In this particular case, another user in the system, Alice, can encrypt a message for Bob using the following policy: “(doctor or nurse) and Mayo clinic and neurology”. Bob can then decrypt this message since using his attributes i.e. doctor, “Mayo Clinic” and “neurology”, he can satisfy the policy utilized by Alice.
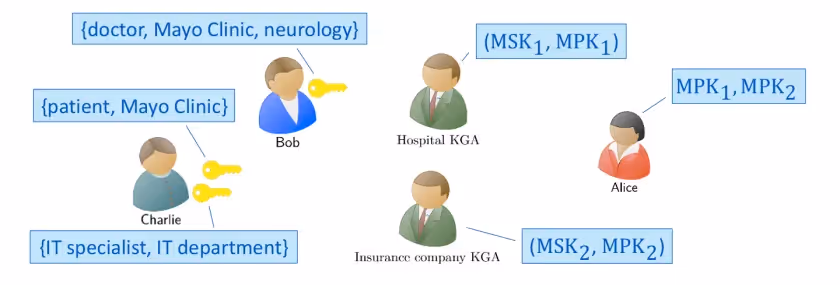
Moreover, multi-authority variants of ABE exist and extend these capabilities to multiple-domain settings thus removing the requirement of having a trusted third party.
For instance, in this case both Bob and Charlie can receive attributes from two attribute authorities, the Hospital and the Insurance company authorities.
Applications of ABE
ABE can be utilized as an authorization mechanism in the Cloud as different works have proposed. In this case, data owners e.g. Alice publish:
Symmetrically encrypted content e.g. media, health records, etc.
Encrypted keys according to a particular access policy.
Only users e.g. Bob, Charlie, with certain attributes can decrypt.
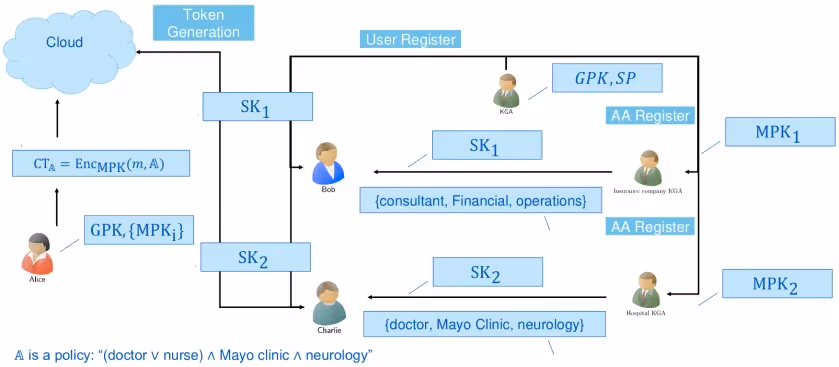
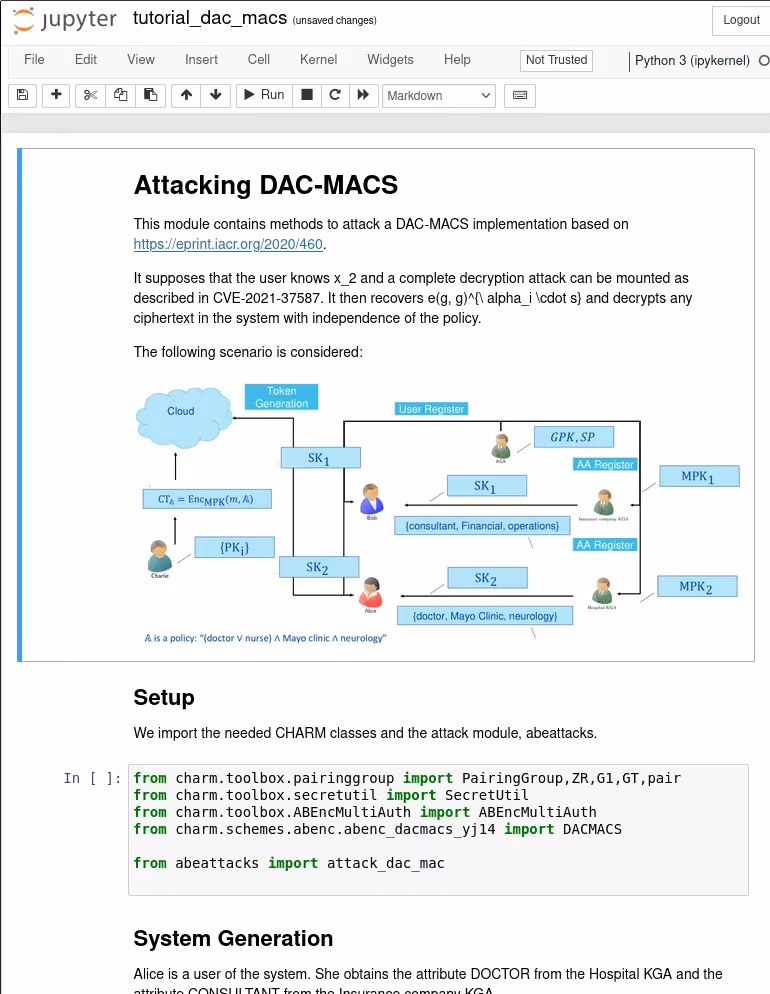
Below, we show how ABE can be used in the Cloud depicting the general architecture of DAC -MACs [1], a highly-cited scheme:
In this case, there are two KGAs in the system: the Insurance company KGA and the Hospital KGA. Alice, is the data owner that wants to share with the user Charlie sensitive data. First, Alice generates a symmetric encryption key that uses to encrypt a message. The message is encrypted using the following policy: ‘(doctor or nurse) and Mayo Clinic and neurology’. Using the token generation mechanism of DAC-MACs [1], Charlie can obtain the ciphertext created by Alice and obtain the content key that opens the sensitive data shares by Alice.
On the other hand, other practitioners have proposed to secure Internet of Things deployments using ABE. In this case, most works are related to the Smart City paradigm. Different types of sensing data are gathered from various sources of the city such as transportation providers and energy infrastructure with the goal of optimization. In this case, ABE can be used to enforce authorization on the collected data to different data owners for analysis. One ABE scheme provided by different open-source libraries and that focuses on IoT deployments is YCT14 [2].
Cryptanalysis frameworks and broken schemes
Several practitioners have proposed techniques and heuristics to analyze the security of ABE schemes This year, at the CT-RSA 2021 conference [3], Venema and Alpár presented attacks against 11 ABE and MA-ABE schemes, including DAC-MACS [1] and the YJ14 scheme [4]. Further, in 2019, Herranz [5] showed that several schemes only based on elliptic curve were broken such as the YCT14 [2] scheme.
In our talk, we demonstrated the practicality of these attacks. We have implemented three different types of the attacks:
A decryption attack against DAC-MACS [1], where a single user is able to decrypt ciphertexts with policies she cannot satisfy. This user does not even need to collude with other users or corrupt an authority.
Second, a decryption attack with corruption of one of the authorities against the YJ14 scheme [4].
A decryption attack against the YCT14 [2] scheme were two users collude in order to obtain a decryption key based on the work of Herranz [5].
Open-source libraries such as CHARM [6] and RABE [7] provide, among others, implementations of these schemes. We have implemented the attacks in the CHARM cryptographic library and show that the implementations of DAC-MACS [1], YJ14 [4] and YCT14 [2] schemes provided by this particular library are vulnerable to decryption attacks.
Based on the status of the schemes, we have obtained the following CVEs:
Together with our presentation, we provide a Python library implementing some of the cryptanalytic attacks of Venema and Alpár [3] against the aforementioned ABE schemes: abeattacks (available at https://pypi.org/project/abeattacks/) .
Further, we have prepared 3 Jupyter notebooks where ABE and the practical attacks against the ABE schemes are illustrated (available at https://github.com/kudelskisecurity/abeattacks/jupyter/). These notebooks can be used to learn more about the attacks in practice.
Many static analysis tools exist out there for detecting security issues. These tools are a necessary part of the development lifecycle. Detecting issues is great but it’s just the first step in the process. Someone still has to remediate those issues. What if we could automatically fix them?
Semgrep is a great static analysis tool. It has a lesser-known but really neat feature in development called Autofix. This feature not only lets you detect security issues, but also automatically fix them, as long as the rule that matched is autofix-capable. Let’s see how this can be achieved with a couple examples.
Example 1: Automatically fixing buffer overflows
Let’s assume we have the following source code in the file buffer-overflow.c:
This code may lead to a buffer overflow. One should not use strcpy but strlcpy and pass the length of the buffer instead.
We can write a Semgrep rule to automatically fix this issue in a file named buffer-overflow.yml, using the fix attribute in our rule:
rules:
- id: buffer-overflow
patterns:
- pattern-either:
- pattern: |
char $A[$SIZE];
$...REST;
strcpy($A, $B);
fix: |
char $A[$SIZE];
$...REST
strlcpy($A, $B, $SIZE);
message: "Use of strcpy is insecure and may lead to buffer overflow. Use strlcpy instead."languages: [ c ]
severity: ERROR
Notice the use of the $...FOOBAR syntax to match every instruction between char $A[$SIZE]; and strcpy($A,$B); so that we can put it back into the replacement code.
Now we can run semgrep with the --autofix or -a flag:
Semgrep also supports regex replacement within a match. Suppose we have the following source code in a file named sid.rs:
fn main() {
let env = "production";
println!("env = {}", env);
let sid = "1336-something";
if env == "production" {
// Note: sid has format "level-name"// and level is a four digit number which should never end with 6 in production!// Use sid levels ending with 7 insteadlet production_sid = "1336-foobar";
println!("production sid = {}", production_sid);
} else {
println!("sid = {}", sid);
}
}
Imagine that sid values should always end with a 7 when used in production. Let’s write a Semgrep rule that automatically fixes this but only when used in production in the file sid.yml:
rules:
- id: sid
patterns:
- pattern-either:
- pattern: |
if env == "production" {
...
let $FOO = "$Y";
...
}
fix-regex:
regex: '(?P<start>[0-9]{3})(?P<last>[0-9]{1})-(?P<description>.*)'replacement: '\g<start>7-\g<description>'message: "Sid level should always end with a 7 in production."languages: [ rust ]
severity: ERROR
Note that we use (?P<GROUP_NAME>REGEX_PATTERN) regex syntax here so that named captured groups can be referenced by their name using \g<GROUP_NAME> syntax in the replacement text.
Now let’s run our rule on our file:
$ semgrep --config sid.yml sid.rs -a
Our code is now fixed in the right place only (variable production_sid):
fn main() {
let env = "production";
println!("env = {}", env);
let sid = "1336-something";
if env == "production" {
// Note: sid has format "level-name"// and level is a four digit number which should never end with 6 in production!// Use sid levels ending with 7 insteadlet production_sid = "1337-foobar";
println!("production sid = {}", production_sid);
} else {
println!("sid = {}", sid);
}
}
Fixing the problem at the source
Semgrep’s autofix feature can go the extra mile and prevent developers from introducing security issues in a production codebase by automatically fixing them.
A possible first step would be to instruct all developers to use pre-commit and install a pre-commit hook that runs autofix semgrep rules automatically before any commit is made. For example, one can document this in our project’s README. This, however, does not prevent anyone from not using pre-commit.
One can be even more strict and set up a CI pipeline that runs our pre-commit hook whenever a pull request is made. If the pre-commit hook changes the code, then it means someone pushed a commit without running pre-commit hooks. In such a case, one can decide to make the pipeline fail. Of course, one would only allow pull requests to be merged if the pipeline successfully completes and we would also disable directly writing to the main branch.
Conclusion
It’s still in the very early stages, but providing capabilities in scanning tools beyond detecting and reporting could have a notable impact on code security and speed of development. Even though it’s still early, we have seen that it is possible to do more and that automatically fixing security issues is possible today. We hope that these examples will be helpful to others too. Keep shrinking that attack surface.
2021
Blockchain
October 15, 2021
Partner Announcement: Panther Protocol
No items found.
Kudelski Security Team
As a continued extension of our decentralized partner innovation ecosystem, I am excited to announce that we have partnered with Panther Protocol to deliver increased privacy enablement as we move forward with delivery of data driven solutions within the US and the UK.
One of the core tenets of the Kudelski ecosystem has always been secrets management within chips, root of trust (RoT), protection of digital artifacts, and ensuring the safety of our customers.
Extending our partner network into the blockchain ecosystem with Panther’s privacy preserving protocol accelerates our ability to bring data marketplace, data monetization, and DeFi enabled ecosystems more quickly to market and to offer more advanced service and build capabilities.
Our first expansion of these concepts will be into the UK market where we will work with the Panther team as well as their privacy-first Web3 development partner Stelium to unlock value within data inside the UK economy.
As we develop this relationship expect some thought leadership pieces as well as some exciting technology advancement as we explore privacy-first architectural advancements in wallets, key management, and scale.
Welcome Panther to the Kudelski Partnership Network!
2021
Blockchain
September 30, 2021
Extending Our Partner Ecosystem
No items found.
Kudelski Security Team
To All Expert Blockchain Companies, Who May Be Interested in Joining our Partner Pool…
Watch out Decentralized Finance, here comes Decentralized Partner Innovation (DEPI)!
The “Speed of Crypto” is honestly at a level none of us have seen before. Even though we employ a team with deep expertise across many cryptocurrency technologies and chains, no one organization (even one in 30+ countries) can hope to keep up with the fast-paced changes we’re experiencing.
Our business is literally on fire. We are finding more situations where we have to either scale beyond our current team to meet the needs, or augment our team with specific expertise we don’t already have.
To help us meet these needs, we have built a model (and invented yet another acronym!) to utilize experts as part of an expanded team of decentralized partners. DEPI will help us deliver world-class security capabilities and meet the ever-expanding needs of our global client base. These partner organizations and/or individual contributors are vetted and bring expertise or parallel/specific expertise to complement or enhance our abilities to help on these very specialized projects.
There are a lot of reasons that we chose to build a decentralized partner team.
First – we can’t be in every country and meet every employment obligation globally… It isn’t feasible and just doesn’t make sense. (Plus – I need to sleep every once in a while…)
Second – some of the best talent in the crypto market have done very well for themselves and do not work for ANYONE. But, while these people enjoy their independence, they also appreciate having access to a larger organization that can offer interesting and challenging projects. This becomes a win-win marriage for both parties – providing them stimulating engagements while enabling us to meet our client needs.
Third – We have high standards. We never skimp on quality. Demand for our services outstrips supply, so we look to expand our resource pool rather than cut corners to save time and be able to deliver against the growing number of projects. We verify that every partner member of this network has a high level of expertise and delivers top-of-the-line quality. In fact, we are so confident that we have done a good job screening these partners that any work that utilizes our partners is under contract with Kudelski, with the concomitant safeguards, Terms and Conditions, and logo. So, anyone engaging our services gets the deep expertise and backing of Kudelski along with the latest in cross-pillar, highly focused expertise required in these fast-moving times.
“It’s hard to find a company that knows how to do this” is something I hear, LITERALLY, every day. I believe that this model will allow Kudelski Security to be the organization that knows how to deliver as well as having the capacity to do so.
Some of the partners that have agreed to add to their teams, or supply team members, to our pool of talent are:
BTBlock – End-to-end development and security services performed by world-renown experts
Providentia Worldwide – A new venture in technology and solutions consulting which bridges the gaps between Blockchain/Distributed Ledger, High Performance Computing, and Enterprise Hyperscale computing. We take the best practices from the most demanding compute environments in the world and apply those techniques and design patterns to your business.
Redpoint Security, Inc. – Application security consulting firm that is focused on all aspects of code security
Kryptus – With 17 years of history and headquarters in Campinas / SP, Kryptus S/A is a Brazilian independent company that has grown consistently for more than a decade, focusing on long-term scientific and technological actions, of understanding of the mission of its clients and in the lines of business that it develops. Kryptus has expertise in Cryptography and has manufactured their own custom line of HSM technology.
As we continue to grow and scale, we will continue to add to our pool of experts as needed.
Are you interested in joining our team or being a node in our decentralized pool of talent? Please contact me here!


 Threat Alert CenterLearn More About Our Detection and Response Services