Imagine you’re safeguarding a fortress in a vast landscape, not knowing from which direction the next attack might come. This scenario is not too different from the challenges organizations face in the cybersecurity landscape today. In this blog post, the Kudelski Security Team, outline the onboarding process and core ideas behind Threat Navigator, Kudelski Security’s cutting-edge technology, designed as a cornerstone of our Next Generation Managed Detection and Response Solutions to enable clients to understand, visualize – and remediate – their security visibility & threat detection gaps.
Contents
The Challenge of Visibility in Cybersecurity
You Don’t Know What You Can’t See
There’s an old expression – based very loosely on Socrates – that says: “You don’t know what you don’t know”. In the security world, this adage has been adapted to “you don’t know what you can’t see” and a whole industry has been built around helping organizations gain true visibility into their threat landscape. Gaining true visibility into your threat landscape is not just about having the right tools; it’s about understanding what you should be looking at (your security visibility priorities) and ensuring no gaps in your defenses. Achieving this level of insight is easier said than done, but it’s crucial for a robust security posture.
How Threat Navigator Empowers You
Trying to obtain true visibility in a way that is both easy and consumable is no easy task. Kudelski Security’s Threat Navigator aims to help clients by answering this difficult challenge. Engagements with clients will usually go through different steps, starting with determining the clients’ coverage (or lack of coverage) up through the final step to determine how to close the priority gaps.
Step one: Determine your overall coverage…or lack of coverage
Using this framework, your coverage will be demonstrated by which techniques you have visibility and detection capability against. The techniques you can cover are determined by:
- The technology you are using (like Endpoint Detection and Response (EDR) and Security Information and Event Management (SIEM) systems)
- The detection rule capability of the technology
- The data sources that can help trigger those detection rules
- Other qualitative factors are taken into consideration such as the detection rule quality (like false positive rate) and the ability to investigate
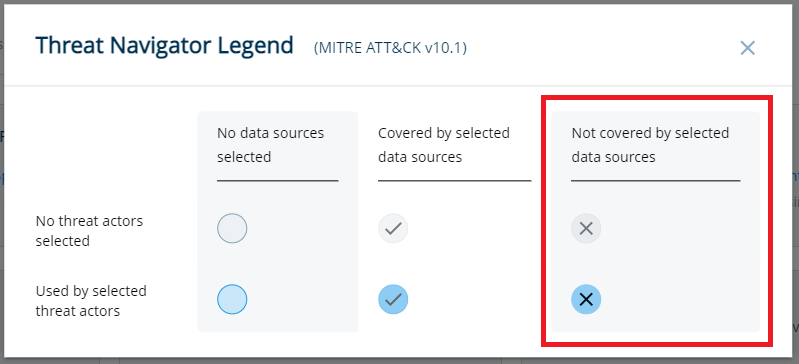
Any gaps in coverage are clearly marked, providing a visual representation of areas needing attention
Step Two: Determine what your security priorities are
Understanding your unique threat landscape is key. To tackle this, we need to consider the client context and, in particular, what are the potential techniques that Threat Actors might use against you. Some of the information can be calculated such as:
- The client’s industry vertical
- The Threat Actors known to target this vertical
- The Techniques used by those threat actors
- Other factors taken into consideration are based on the client’s full context – more on this a bit later
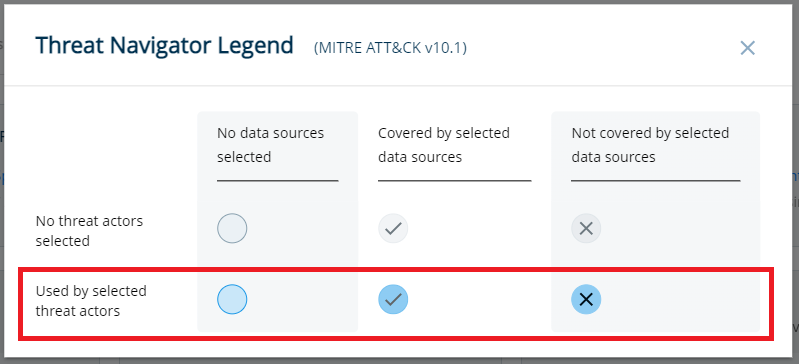
In this example, the prioritized technique is highlighted in blue (while the non-prioritized technique is gray).
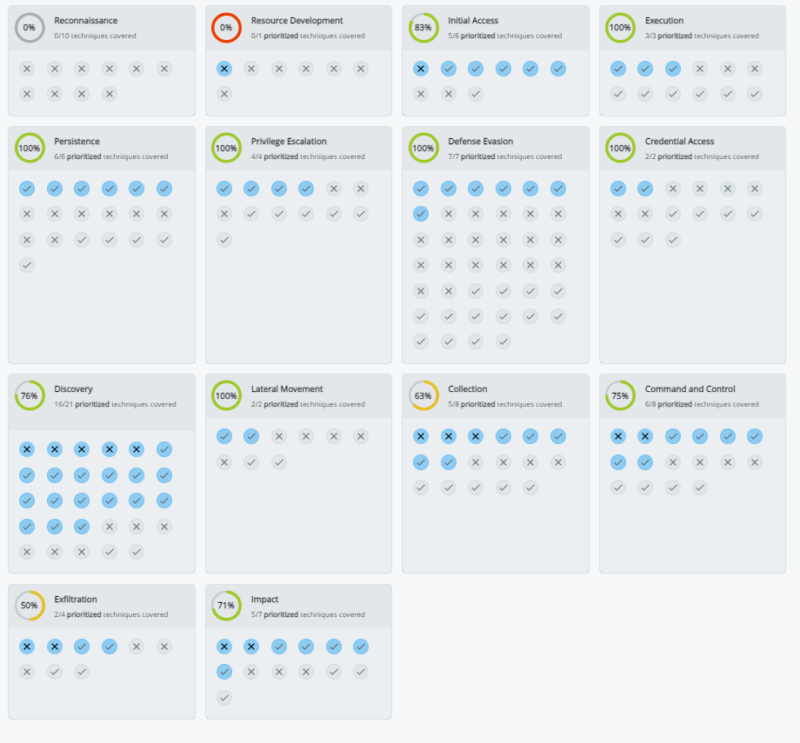
Once you have compiled your coverage and your priorities, you have a full overview of your priority gaps (each card represents a MITRE Tactic and each circle an individual MITRE Technique).
So, Problem Solved? Well, that would be too easy, right? This initial outcome already provides you with a good first idea of your priorities, but not the full picture yet. There are still a few answers that are missing, which leads to the next step: deciding what gaps you should prioritize.
So, problem solved?
Well, that would be too easy, right?
This initial outcome already provides you a good first idea of your priorities, but not the full picture yet. There are still few answers that are missing, which leads to the next step: deciding what gaps you should prioritize.
Step three: Determine what coverage gaps you should prioritize
There are different approaches to prioritizing your coverage gaps. The approach we have taken with the Threat Navigator is to not just identify gaps, but to also prioritize them based on the frequency of use by threat actors. Although other approaches might also work, this quantitative approach offers a clear path to strengthening your defenses, focusing on the most impactful areas first.
Customizing Your Coverage
Recognizing that every organization’s needs are unique, Threat Navigator allows for customized gap analysis. Whether adjusting for additional security tools, refining the representation of your security posture, or recalibrating based on specific threat actor concerns, you have the flexibility to tailor the tool to your exact requirements.
What About the Remaining Security Coverage Gaps?
As mentioned earlier, the Threat Navigator will show you the top 5 gaps on the landing page. However, you will still have the ability to review the full list of remaining gaps in the “Recommended Actions” section.
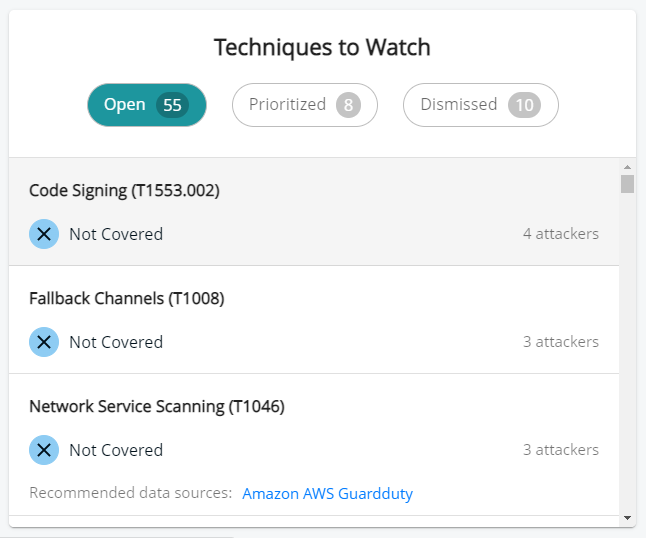
In this section, the “Open” tab will show you all your potential gaps based on the internal calculation made; however, this method might overlook some client specificity. This is why we provide the user with the ability to make some decisions such as:
- Prioritize a technique: A technique gap might be low on the list, but for the user, it might be of particular importance, so we allow a user to prioritize a technique to ensure they always have an eye on it.
- Dismiss a technique: On the other hand, a technique might not be relevant for the client (for any number of different reasons), which is why we’ve built a workflow to allow the user to “dismiss” a technique while providing additional information on this decision. In future reporting, the reason for dismissal will always be noted for reference.
What if the information is not accurate?
The coverage, the gaps, and the priority are all determined by the processed client data and the implemented logic… but what if the information is not complete or accurate?
Although we aim to provide the best coverage and gap information possible, there are still a few ways that the data might not be fully representative of the client’s situation, such as:
- Clients may have other security tools, not managed by Kudelski Security, which might cover some gaps.
- Clients may decide that a particular gap is covered (or not covered) and, therefore, want to show a refined representation of its security posture.
- Clients may think that some Threat Actors are under- or overrepresented.
So, how do we solve that?
This is probably one of our favorite features in the Threat Navigator: Client-Modified Coverage.

Clients can easily switch from the Kudelski Security gap calculation to their modified gap calculation, making the Threat Navigator not a vendor-specific tool, but a true client tool.
Let’s review what you can modify:
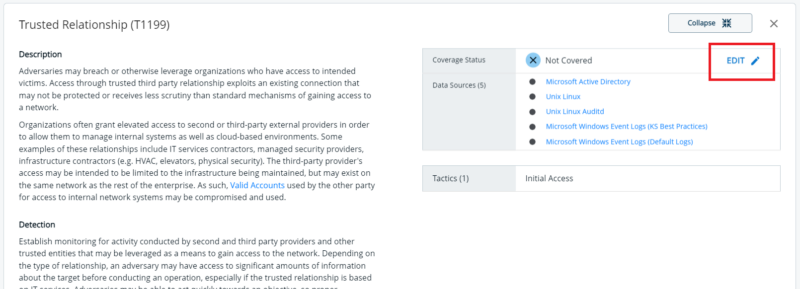
Technique coverage:
- You can effortlessly adjust any technique or sub-technique by simply changing its coverage status. When making this change, you have the option to leave a comment detailing your reasoning(which will be stored in the reporting). Other users will be able to see who modified the technique when it was modified, and what the reasoning behind the decision was.
Data source:
- Let’s say that you have a data source that is not activated in the Threat Navigator (maybe it’s managed by another vendor or Kudelski Security just doesn’t have the information). You can simply edit any data source that will adapt your coverage.
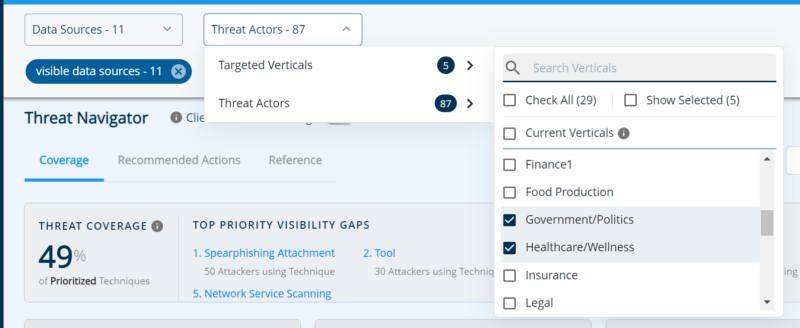
Threat actors & vertical(s)
- What if you operate in more than one industry vertical and you believe that some Threat Actors are targeting you in particular? The Threat Navigator allows you to change those parameters and review how it modifies your gaps.
Step Four – What should I do with the information I have? How, practically, do I close the gaps?
Once you’ve tailored Threat Navigator to reflect your organization’s unique security landscape and defined the best representation of your gaps, the final step is to act on your insights. There a two key actions you can take:
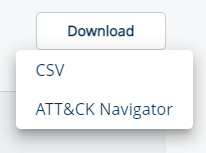
Download and Analyze Your Coverage Data
The first thing you can do is download your coverage (in CSV or ATT&CK Navigator format). This allows you to manipulate the data according to your needs, providing all the detailed information you require, such as the rationale behind marking a technique as covered or not, who made these decisions, and when.
Implement Solutions to Cover the Security Gaps
The second thing you can do, and arguably the most important thing, is understand how you can cover those gaps. This could involve several strategies, such as:
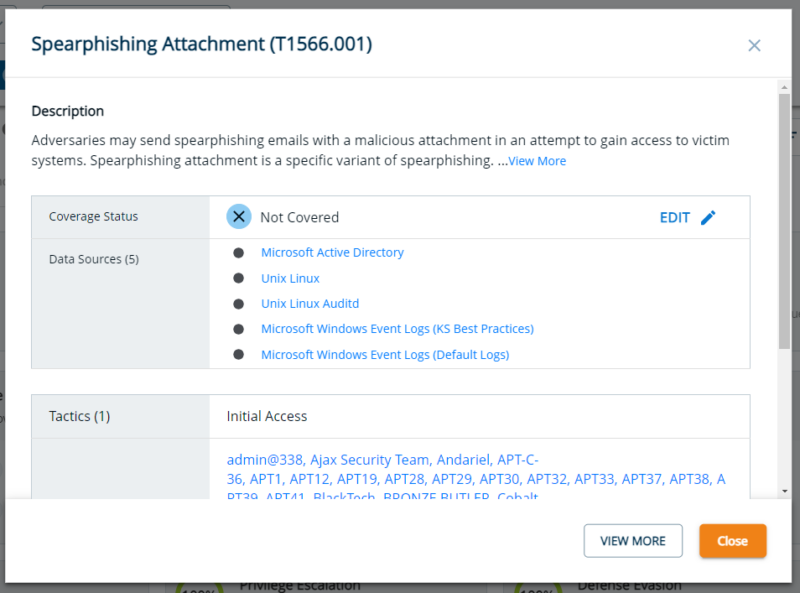
Identifying missing data sources:
Your primary focus should be on uncovering any data sources you currently possess that are not being utilized to their full potential. The Threat Navigator helps you identify these potential data sources for each technique, guiding you to where your attention is needed most.
Overcoming technology limitations:
Sometimes, the technology you use may have limitations in its coverage capabilities. It may be such that a rule is active for technology A but not for technology B. Our detection team does their best to identify and bridge a technology gap, but it could happen.
Creating New Detection Rules:
This is the least preferred scenario, but in cases where no existing data source or rule covers a technique, it’s vital to explore new rules or methods for detection. The next phase of our Threat Navigator aims to compile all client data to highlight what are the most common gaps and effective ways to cover them efficiently.
Where Do We Go From Here?
At Kudelski Security, we are particularly excited by the value Threat Navigator will bring our clients. An innovative, dynamic approach to visualizing your threat coverage gaps drives us all forward to a more secure future.
Discover more about our Managed Detection and Response services and how they complement the capabilities of Threat Navigator or request a Threat Navigator demo today and take the first step towards closing your security gaps.


